Monthly Archives: March 2013

A simple PowerShell script for redeploying a SharePoint wsp solution file

I often get WSP’s from our developers to redeploy in our various environments.
For our more sophisticated deployments we use Nik Patel’s Deployment script

However we often have smaller “one time” deployments. For those tiny deployments I created the script below.

If you’re the Visual Type, you might like this video on youtube.

(The script is below the video if you want to copy/paste)

Here’s the Script:

#this script might be easier to read on this blog if you click the "pop out" icon in the toolbar above.

#Simplple WSP redeplyment script from SharePointJack.com
#http://sharepointjack.com/2013/a-simple-powershell-script-for-redeploying-a-sharepoint-wsp-solution-file/
#first we add the SP snap in so that this can be launched from "normal" powershell
Add-PSSnapin Microsoft.SharePoint.PowerShell –ErrorAction SilentlyContinue

#While not really needed, I like to wrap functionality in a function
function main {

	$path = get-location # gets the location this script is running - it is assumed you have the WSP in the same directory
	$wsp = "nameofyour.wsp" #name of the WSP

        #this switch statement lets you assign the webapp URL based on the machine it's run from - in this way you can use the same script for Dev, stage and production.
	switch($env:computername)
	{
	 "DevelopmentServerName" {$webapp = "http://dev-url.yoursite.com"}
	 "StageServerName" {$webapp = "https://stg-url.yoursite.com"}
	 "ProdServerName" {$webapp = "https://prod-url.yorusite.com"}
          default {write-host "This should be run from the central admin box - Press any key to exit this script"; read-host; exit}
	 }

	write-host "retracting $wsp from $webapp"
	uninstall-spsolution $wsp -WebApplication $webapp -confirm:$false
	wait4timer($wsp)
	write-host "Removing solution $wsp from the farm"
	remove-spsolution $wsp -Confirm:$false
	write-host "Done Removing"
	sleep 2
	write-host "Adding solution $path\$wsp to the farm"
	add-spsolution -literalpath "$path\$wsp"
	write-host "Deploying solution $wsp to $webapp"
	install-spsolution -Identity $wsp -WebApplication $webapp -gacdeployment
	wait4timer($wsp)
	write-host "Done adding"
	write-host "press any key to continue"
	$a = read-host
} #end main

#I grabbed this right from Nik Patel's script - there are some operations that you cant do in quick succession - the system needs time to copy to each node and let the timer job run it's course.
# one way to deal with this, is to use a sleep timer, but that's not exact, I liked Nik's approach of checking the solution's job status - well done Nik!
function wait4timer($webapp) {
	$solution = Get-SPSolution | where-object {$_.Name -eq $wsp}
	if ($solution -ne $null) 
	{
		$counter = 1   

		Write-Host "Waiting to finish soultion timer job"
		while( ($solution.JobExists -eq $true ) -and ( $counter -lt 50 ) ) 
		{   
			Write-Host "Please wait..."
			sleep 2
			$counter++   
		}

		Write-Host "Finished the solution timer job" 		
	}
} #end wait4timer
main
SharePoint Server WFE High CPU caused by workflow.

Today I had some complaints that the SharePoint farm was slow – one of our teams noticed that an automated site creation process they used was timing out which is rare.

I brought up task manager which showed one of the w3wp.exe processes taking up about 25% CPU on a 4 core system.

I then launched Sysinternals process explorer, which if launched as an administrator, has some nice features.

Using Process Explorer, I was able to tell which IIS site the w3wp runaway process belonged to.
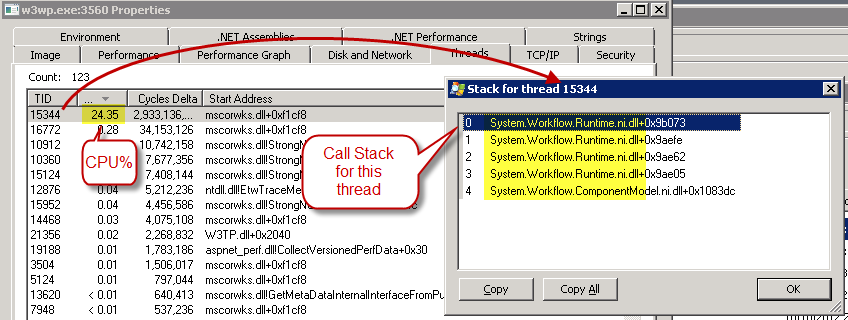
Then I was able to look at the threads to see what thread was consuming CPU in the process
and then I was able to look at the call stack for the thread, which shows the name of the DLL/EXE that was being called – it indicated that Workflow was the likely culprit.

Process explorer1

I then searched the internet for a powershell command to list workflows in the farm and found this one:

http://sharepointrelated.com/2011/11/21/get-all-workflows-in-all-sites-and-lists/

With a little bit of fiddling, I was able to alter the script to just the web application (IIS site) in question.

A little bit more fiddling and I added the number of RunningInstances and added an if statement to the output so that it would only output the workflows with running instances.

I was then able to send that to our development team to check up on things

The completed script:
(All credit really goes to Nico Martens at sharepointrelated.com,
I’m only including the script here because I altered it to add the Running count which wasn’t in his original script):

param ([boolean] $writeToFile = $true) 
#List all workflows in farm 
Add-PSSnapin Microsoft.SharePoint.PowerShell -ErrorAction SilentlyContinue
#If boolean is set to true, you can specify an outputlocation, to save to textfile.
if($writeToFile -eq $true) 
{ 
$outputPath = Read-Host "Outputpath (e.g. C:\directory\filename.txt)" 
} 
#Counter variables 
$webcount = 0 
$listcount = 0 
$associationcount = 0
#Grab all webs 
Get-SPSite -webapplication "https://www.mywebsite.com" -Limit All | % {$webs += $_.Allwebs} 
if($webs.count -ge 1) 
{ 
	write-host "Starting"
    foreach($web in $webs) 
    { 
	#write-host $web
    #Grab all lists in the current web 
    $lists = $web.Lists    
        foreach($list in $lists) 
        { 
        $associations = @() 
        #Get all workflows that are associated with the current list 
            foreach($listassociation in $list.WorkflowAssociations) 
            { 
            $associations += $($listassociation.name) + " running:" + $($listassociation.RunningInstances)
            } 
            $listcount +=1        
            if($associations.count -ge 1) 
            { 
			if ($listassociation.RunningInstances -gt 0) {
            Write-Host "Website"$web.url -ForegroundColor Green    
            Write-Host "  List:"$list.Title -ForegroundColor Yellow 
            foreach($association in $associations){Write-Host "   -"$association} 
            
                if($WriteToFile -eq $true) 
                { 
                Add-Content -Path $outputPath -Value "Website $($web.url)" 
                Add-Content -Path $outputPath -Value "  List: $($list.Title)" 
                foreach($association in $associations){Add-Content -Path $outputPath -Value "   -$association"} 
                Add-Content -Path $outputPath -Value "`n" 
                } 
            } }
        } 
$webcount +=1 
$web.Dispose() 
    } 
#Show total counter for checked webs & lists 
Write-Host "Amount of webs checked:"$webcount 
Write-Host "Amount of lists checked:"$listcount 
} 
else 
{ 
Write-Host "No webs retrieved, please check your permissions" -ForegroundColor Red -BackgroundColor Black 
}

PS, I kept this script Private for a while because I wanted to get Nico’s permission to include his script with my revisions here.
I’m happy to report that Nico was ok with that – thanks to his generosity, this is now a public post!
Nico Martens

Powershell for working with SharePoint Recycle Bin

I had to look through the SharePoint recycle bin today to look for something – the UI interface is a bit lacking – it only shows 200 items at a time with no ability to search so I turned to powershell…

Looking at the recycle bin is actually very easy…

# recycle bin's are tied to a site collection so we need a site collection object

$site = get-spsite http://www.yoururl.com

#we can see everything in the recycle bin like this:
$site.Recyclebin

#unfortunately, the above command dumps quite a lot to the screen.
#fortunately, we can pipe the output to other commands for filtering and cleanup.

#This command will return all the webs in the recyclebin
$site.Recyclebin | where {$_.itemtype -eq "web"}

#we can build on this by adding a sort statement, 
#here I sort by dirname, which is the URL path the item would have been at before it was deleted
$site.Recyclebin | where {$_.itemtype -eq "web"} | sort dirname

# we can format the output into a nice list
$site.Recyclebin | where {$_.itemtype -eq "web"} | sort dirname | select title, itemtype, dirname, itemstate

#note that in the above listing, itemstate shows which recycle bin it's in (FirstStageRecyclebin = End user Recycle Bin Items, SecondStageRecycleBin = Deleted from end user Recycle Bin)

#here's one more application of filtering to show everything that's not a page nor a list item

$site.RecycleBin | where { $_.itemtype -ne "file" -and $_.itemtype -ne "ListItem" } | sort dirname | select title, itemtype, dirname

Using some of the simple queries above, I was able to look deep inside our recycle bin quickly without having to browse it in pages of 200 items at a time.

Update: this came in kinda handy.. one of our developers wrote some “site clean up code” Long story short, several hundred web’s were deleted that should not have been…

#script to restore all the webs in the recycle bin
#note: be sure to scroll over
#the word press template cuts off the right side
# or choose "Full screen" from the menu on this code window
$SiteCollection = get-spsite http://www.yoururl.com
$SitesToRecover = $siteCollection.RecycleBin | Where {$_.ItemType -eq "Web" -and 
#in this where clause, it's best to run this twice - the first time, restrict it to the root sites, with the $_.Dirname -eq "sites/myteamsites", then after those have been restored, you can take that last statement out and run it again to get the sub sub webs.
$_.DeletedBy -like "SHAREPOINT\system" -and $_.Web -Like "" -and $_.DirName -eq "yourrootURLfragment"}
foreach ($OneSite in $SitesToRecover) { $OneSite.Restore() }


One More:

#Deleting an item didn't work with the $item.delete() 
#"Due to the state of the object" 

#I found this worked instead
$sitecol = $get-spsite http://yoururl.com
$items = $sitecol.recyclebin
$item = $items | Select -first 1
$Guid = new-object system.guid($item.id)
$sitecol.recyclebin.delete($guid)


Simple PS script to move users between SharePoint Security Groups

Today a user had a simple request – about 450 users were added to the wrong SharePoint Group.
They needed to be moved from the Members group to the Visitors group.

My first thought was to rename the groups and change permissions, but the user had already started the process and had moved about 100 of them manually before calling me.

So I had to move 350 users, and couldn’t rename and re-permission either Group.

My first though was to just dump a list of all the user ID’s from the Members Group using Powershell – I would paste them into the GUI to add them to the Visitors Group.

I used powershell to get the list of users:

$web = get-spweb "http://urlto.yourdomain.com/yourweb"
$group = $web.groups | where {$_.name -eq "Name of your Group" }
foreach ($user in $group.users) { $user.userLogin + ";" }

The above script dumped a bunch of user ID’s to the screen and my intention was to copy that right off the PowerShell screen. (Note I added the semicolon to make it easier to add the whole list in one copy/paste operation)

My first snag was that you can only paste in 200 users at a time, not a big deal, I did a few small groups.

Now I just needed to delete all the users from the Members group- Easy Right?
Well, it would be if I had less than 30- SharePoint only shows 30 members of a group at a time. You can select all 30 pretty easily, but I wanted to delete 350.

Back to Powershell
This script deletes everyone in the given group:

$web = get-spweb "http://urlto.yourdomain.com/yourweb"
$group = $web.groups | where {$_.name -eq "Name of your Group" }
foreach ($user in $group.users)
 { 
   $group.RemoveUser($user)
 }

Job Done.

Of course, at this point, I thought, shoot, I could have/should have just scripted the whole copy operation – can’t be that hard right?

$web = get-spweb "http://urlto.yourdomain.com/yourweb"
$SourceGroup = $web.groups | where {$_.name -eq "Name of your Source Group" }
$TargetGroup = $web.groups | where {$_.name -eq "Name of your Target Group" }
foreach ($user in $Sourcegroup.users)
 { 
   Write-Host "Moving $user from $SourceGroup to $TargetGroup"
   $TargetGroup.AddUser($user)
   #$SourceGroup.RemoveUser($user)
 }

Disclaimer – I haven’t tried this- by the time I got this far, I had already deleted all the users so this is more of a “for future reference” kind of script.

Ideally there might be a return value on .addUser that would let me know if it was successful, or you might run the script twice, the first time with the remove statement commented out, Then do a quick visual check that your Target Group has the users you need, then run it again to empty the SourceGroup.