Category Archives: O365

Modify-Sublicense PowerShell function for modifying Office 365 Sublicenses

Modify-Sublicense

An example call would be:

Modify-Sublicense -upn "joe@yourcompany.com" -PrimaryLicense "TENANT:ENTERPRISEPACK" -SublicensesToRemove @("SWAY","YAMMER_ENTERPRISE") -SublicensesToAdd @("SHAREPOINTENTERPRISE", "SHAREPOINTWAC")

If you’re new to powershell, scroll down past the code below for some additional tips.

Naturally, sublicenses you had before will REMAIN unless you’ve removed them.
AND
Sublicenses you DID NOT HAVE before will NOT BE ADDED unless you specifically add them.

This is important because of how the licensing works, which has been covered in other blog posts my myself and others.

I’ve used the function below as part of a larger script with good results.

As always, TEST BEFORE YOU USE IT!

##---------------------------------------------------------------------
## this function Adds and or removes sublicenses 
## Pass in the -SublicensesToAdd and -SublicensesToRemove as an array ( use $var = @("value", "Value")  )
##  to a user's Pre-Existing License (for example TENANT:ENTERPRISEPACK)
##---------------------------------------------------------------------
function Modify-SubLicense($upn, $PrimaryLicense, $SublicensesToAdd, $SublicensesToRemove)
{
	$spouser = get-msoluser -userprincipalname $upn
	#assemble a list of sub-licenses types the user has that are currently disabled, minus the one we're trying to add 
	$disabledServices = $($spouser.Licenses | where {$_.AccountSkuID -eq $PrimaryLicense}).servicestatus | where {$_.ProvisioningStatus -eq "Disabled"}  | select -expand serviceplan | Select ServiceName 
	
	#disabled items need to be in an array form, next 2 lines build that...
	$disabled = @()
	foreach  ($item in $disabledServices.servicename) {$disabled += $item}
	
	write-host "   DisabledList before changes: $disabled" -foregroundcolor yellow
	
	#if there are other sublicenses to be removed (Passed in via -SublicensesToRemove) then lets add those to the disabled list.
	foreach  ($license in $SublicensesToRemove)
	{
		$disabled += $license 
	}
	
	#cleanup duplicates in case the license to remove was already missing
	$disabled = $disabled | select -unique
	
	#If there are licenses to ADD, we need to REMOVE them from the list of disabled licenses
	# http://stackoverflow.com/questions/8609204/union-and-intersection-in-powershell
	$disabled = $disabled | ?{$SublicensesToAdd -notContains $_}
	
	write-host "    DisabledList after changes: $Disabled" -foregroundColor green
	
    $LicenseOptions = New-MsolLicenseOptions -AccountSkuId $PrimaryLicense -DisabledPlans $disabled
	set-msoluserlicense  -userprincipalname $upn -licenseoptions  $LicenseOptions
}

New to powershell?

Here are a few tips:

  • Since the code is a function, you’ll need to copy-paste it to a script of your own before you can use it
  • In powershell, functions need to appear in your script above/before you use them.
  • There are ways to load the function in memory, so you can call it as if it was a native command. See How to add functions to your powershell session
  • An array in powershell can have zero or 1 or many items, if you need to pass a single value, just pass it as an array with one value. That would look like this: @("Value1", "Value2")

– Jack

Replace an expiring Client Secret in an app for SPO

What are we even calling these things these days? Apps for SharePoint Online? Apps for Office 365?

This article is about the apps we build using the new app model that was introduced along with SharePoint 2013. It’s the main way of developing functionality for SharePoint Online.

The apps are hosted in Azure (or on the hosting provider of your choosing)

When these Apps are created/installed a Client secret is used to ensure that communication between your externally hosted app and SharePoint Online is secure and not coming from an attacker.

Unfortunately these certificates expire.

Ours have.

The article below talks about replacing them.

https://msdn.microsoft.com/en-us/library/office/dn726681(v=office.15).aspx

We also opened a ticket with Microsoft Premier Support which revealed a few more tidbits.

  • It takes like 24 hours for the new certificate to propogate through your system, leaving your app out of commission for at least that long if you don’t renew before it expires.
  • The article above mentions, but does not give an example of, extending the date from the default 1 year to 3 years. I’ve copied some of the correspondence with Mustaq Patel from Microsoft, who helped us through the process (Thanks Mustaq!)

Note for the scripts below, you’ll need your clientID this is in the web.config of your website that’s hosted in Azure.  As luck would have it, the person at our company who would have had this info was on vacation. Since it’s in the web.config of the running app, it made sense to just pull the actual web.config in use. I did this via FTP, using the steps in this article to configure an FTP account to gain access to the server:

https://azure.microsoft.com/en-us/documentation/articles/web-sites-configure/

Update: You can also find the clientID by going to any sharepoint site that uses the app, Site Settings->Site App Permissions.

It’ll be the guid between the last pipe symbol and the @ symbol

Example i:oi.t|blahblahblah|abcdef-1234-this-is-aguid-and-is-what-you-want@7a534-no-the-guid-you-want-123

(thanks to Mustaq for pointing this out!)

  1. Connect to MSOnline using tenant admin user with below powershell in SharePoint 2013 powershell
    import-module MSOnline
    $msolcred = get-credential
    connect-msolservice -credential $msolcred
  2. Get ServicePrincipals and keys. Printing $keys will give 3 records, replace each KeyId in key1, key2 and key3. You can also see EndDate of each key. Confirm if your expired key shows there. Also note that clientId needs to match as per your clientId.

    $clientId = "29b6b386-62a6-45c7-beda-abbaea6eecf2<< CHANGE THIS"
    $keys = Get-MsolServicePrincipalCredential -AppPrincipalId $clientId
    Remove-MsolServicePrincipalCredential -KeyIds @("key1","key2","key3") -AppPrincipalId $clientId
  3. Generate new ClientSecret for this clientID. Please note it uses clientId set in #2. Also ClientSecret is valid for 3 years.

    $bytes = New-Object Byte[] 32
    $rand = [System.Security.Cryptography.RandomNumberGenerator]::Create()
    $rand.GetBytes($bytes)
    $rand.Dispose()
    $newClientSecret = [System.Convert]::ToBase64String($bytes)
    $dtStart = [System.DateTime]::Now
    $dtEnd = $dtStart.AddYears(3)
    New-MsolServicePrincipalCredential -AppPrincipalId $clientId -Type Symmetric -Usage Sign -Value $newClientSecret -StartDate $dtStart  –EndDate $dtEnd
    New-MsolServicePrincipalCredential -AppPrincipalId $clientId -Type Symmetric -Usage Verify -Value $newClientSecret   -StartDate $dtStart  –EndDate $dtEnd
    New-MsolServicePrincipalCredential -AppPrincipalId $clientId -Type Password -Usage Verify -Value $newClientSecret   -StartDate $dtStart  –EndDate $dtEnd
    $newClientSecret
  4. Copy the output of $newClientSecret.

  5. Replace the Web.config with this ClientId and ClientSecret. Please note we don’t need SecondaryClientSecret appsettings.

  6. Wait for 24 hours to propagate ClientSecret to SPO

FINALLY! It’s now possible to migrate data to SharePoint Online without data loss.

After 18 months of persistence, we’re finally able to migrate to SPO.

Up until yesterday, it wasn’t possible to migrate user data from SharePoint if the user was missing from Active Directory. It is now if you’re migrating to SharePoint online and using the new migration API!


Early on we ran into what was a pretty glaring problem for us, and I suspect for anyone else trying to migrate using a client side migration tool.

The Problem:

One of the data types in SharePoint is the “user” data type.
This is most commonly used/seen in document libraries – it shows you who last edited/updated a document.
It’s also commonly used as a field type in a SharePoint list.
For example, you might have a sharepoint list named “legal cases”

The problem is, using the client side API used for most migration tasks involving SharePoint Online, you can’t insert a name of a person if that name can’t be found in Azure Active Directory.

The 18 month Path to Resolution:

While it didn’t take Microsoft 18 months of actual work to fix this, it was about 18 months from start to finish.

I won’t bore you with the details, but the take away here is to never give up. We were told ‘no’ or ‘it can’t be done’ or ‘that’s by design’ multiple times.  This was an important issue so we pressed on, reaching out to every contact we knew, from multiple levels within our organization to multiple levels within Microsoft. All that persistence paid of!

Sidenote

One conversation along the way that was particularly interesting was a special presentation Microsoft had arranged where we got to talk to the person who led Microsoft’s internal migrations from on premise to office 365. I was eager to ask them how they had moved list data with abandoned user data – I was certain they had some internal tool, or did some back door load that wasn’t available to outsiders, or maybe had some script that identified every instance of the missing users and recreated them in AD so the migration could complete.  When I asked, they skirted the issue. I pressed on. After they told me, I understood why. They didn’t do it. When pressed they said they had to leave some data on premise because there was no way to move this data to SPO. On that day, I felt both validated and let down at the same time!

The Solution:

At ignite 2015, Microsoft announced a new Migration API for SharePoint Online.

On the same day, ShareGate announced that it would support this new API with it’s new ‘insane mode’. I spoke with a few people, some thought this new API would resolve the issue, while others said it would not – it didn’t at that time. 🙁

Shortly after our case must have reached one of the senior escalation engineers at Microsoft – I remember being told that the new API resolved the issue, then going back with evidence that it didn’t and I think that’s when traction really picked up. We supplied a Business impact statement and Microsoft added the fix to the list of things they were working on.  The feedback I got down the road was that this ended up being a huge undertaking for them. It wasn’t nearly as easy as one would think, due to how SharePoint is structured internally.  There were multiple setbacks, but we received excellent communication and updates. The time line didn’t bother me – I was thrilled to know it was being worked on.

Fast forward to fairly recently and we received word that the fix was approved and would be moved into our tenant. This was great news! Work didn’t end there however.

Microsoft went into depth about the work done to fix this issue.

While I had expected some new API, or an option when sending data like “override if missing” no such changes were needed. Microsoft updated the migration API to handle all of the needed back end stuff seamlessly. They did not update the CSOM. This meant that for this to work, the new API had to be used.

We were already using ShareGate coupled with insane mode which uses the API. I remember from past conversation with them that ShareGate uses a combination of insane mode and CSOM – even when insane mode is being used – I figured this would mean ShareGate would need to be aware of the changes to the migration API and would need to handle things differently. For example, in the past, ShareGate could replace a missing user with a user of our choice, this would no longer be necessary.

ShareGate was great to work with – they had long been aware of the user data migration issue and understood what I was talking about almost immediately.  Once the API had been updated, the three of us worked together to ensure that Sharegate’s test tenant also had the new Mirgration API updates so they could code up a solution.

I’m soo pleased to say that Sharegate turned this around in about a month, and we received a beta last Friday.  Even more impressive is that the very first beta from ShareGate with support for this worked like a charm!

Even more impressive is that the very first beta from ShareGate with support for this worked like a charm!

Sharegate has released version 5.8 with this functionality Today (2/29/2016).

Confirmed: Microsoft has already rolled this out to all O365 tenants. (as of 2/29/2016)

Special kudos and thanks to Brent Vezzoso and the unnamed hero’s within Microsoft who worked so tirelessly to make this happen. I can’t tell you enough how much this means to me, my company, the SharePoint community, and to Microsoft. You’ve done a great thing here!

  • Jack

An o365 Support case that was handled so quickly, I had to write about it!

I was so impressed with how fast this was turned around, I had to write about it…

A special shout out to Microsoft Sr. Escalation Engineer Sridhar Narra and the support team including Linda PorcelliLoren Jacobson and Tiffany Evenson who worked to resolve this issue so quickly!

Apparently in email addresses, the single quote is a legal character.

So names like: Bill.O’Brian@yourcompany.com are legal in the email sense.

Addresses like this can cause havoc on programmers.

Well it turns out that we had a few people like this in our company and this did not play well with Office 365 at all.

The first, and easiest thing we noticed was that if you found a person like Bill O’Brian in search and tried to click on them, the profile page for the user threw an error.

We opened a case with Microsoft and I was expecting something short like “Don’t use quotes in your email” but instead, they looked into and fixed it. FAST.

I’m used to changes in o365 taking 3 months to make it from ticket to production, this one took a few weeks, from the time we opened the ticket, to the time the issue was resolved in production.

This is a pace of improvement and change I’ve not seen until now and it’s really exiting to see things get fixed this quickly!

A special shout out to Microsoft Sr. Escalation Engineer Sridhar Narra and the support team including Linda Porcelli, Loren Jacobson and Tiffany Evenson who worked to resolve this issue so quickly!

As a side note, a  quotation mark in an email address has issues in other places of SharePoint. Our case was split into several cases. Sridhar’s team worked on the profile page, There’s another team looking at another case which I’ll update in the future when I have more information.  If your organization has issues similar to this, please open a premier ticket.

– Jack


A quick update on where I’ve been…

I noticed today that I haven’t posted anything in a while here- notably the entire month of August. That’s partly due to vacation schedules in the summer – I went on a family vacation then went to Laracon for 4 days in Kentucky to learn more about PHP the programming language that powers more websites in the world than any other language. (Like 81%!)

Investing in On premise SharePoint today feels like putting new tires on a car you’re going to junk in 2 months.

Another reason though, is that as we move to office 365, my job role is changing. It’s been a good year now since I’ve built up a new on premise farm for work, and even the announcement of SharePoint 2016 on-premise doesn’t really excite me.  It appears that on-premise has a limited future, and the cloud is the direction of the future, not just for SharePoint but for lots of technologies.  Investing in On premise SharePoint today feels like putting new tires on a car you’re going to junk in 2 months.

So as I work more with o365 and less with on premise, the issues I face are different.  In August I created a series of 20 or so SPO training videos and put them up in the Office 365 video portal (that I’ll be talking about in my talk at SPSTC in October) That took a good part of my free time.

I’ve spent a lot of time opening issues with Microsoft. Today I have a success story to share, which I’ll post separately on. I believe I have another success story coming in Late October that’s HUGE for the SharePoint community, and critical for the migration to o365 from on premise.

As always, thanks for stopping by!


Script for Auto-Adjusting Site quotas in SharePoint Online / O365 based on current useage

** IMPORTANT UPDATE #2 -this is no longer needed.

As of September 2015, Site Quotas are no longer needed!

The screenshot below came from our tenant settings screen – Set it to Automatic and forget about site quotas!

AutoStorageSPOnline

** IMPORTANT UPDATE RELATED TO SHAREPOINT / OFFICE 365 VIDEO SITES ** (Updated April 29th 2015)

If you use the script below, you may want to put in a filter to prevent the script from working on any site with the managed path of /portals/

Explanation:

Microsoft recently added Video portals to office 365.

Ours was added this morning.

I looked at it in the admin screen because I was curious what site collections had been created.

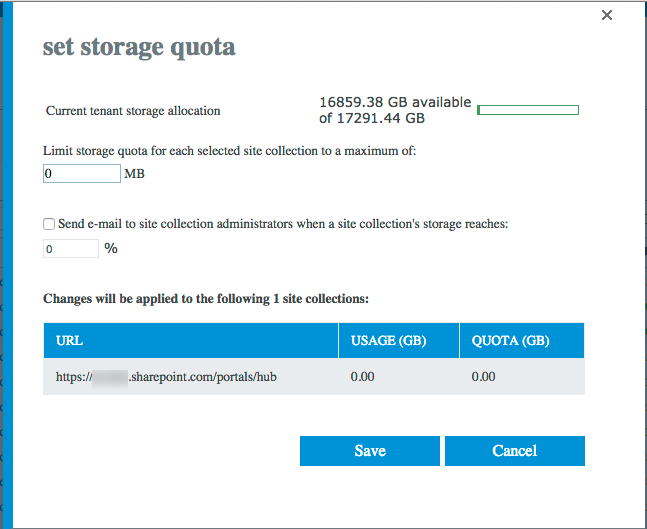
I noticed something peculiar: The Storage Quota was 0.

2015-04-29_17-34-23

You can’t set a quota to zero. Not in the UI, not in PowerShell.

Well tonight my script ran and guess what, it reset my quote on the Video portal.

Originally, Video portal storage was supposed to come out of the overall SPOnline allotment, so this may not be a big deal, maybe we needed to set it anyways?

But, since it’s not possible to set zero manually, I wonder if this was one site you didn’t have to manage/pre-allocate storage too? Or maybe MS decided to make storage unlimited?

I’m not really sure, but in the short term, I thought I’d best warn people that there are some unknowns here as it relates to using the below script with Office Video.


AND NOW BACK TO OUR ORIGINAL ARTICLE, as it was published on April 15th:

The year is 2015, You’ve just been given “TONS” of storage on SharePoint online, and someone says “Lets give everyone a 200GB site quota”.

Seems like a great idea, you’ll never run out of space, so why not set the limit high?

Well, it turns out, the word “Quota” has a different meaning in SharePoint Online / Office 365 than it did in SP on Premise.

In the On Premise version of SharePoint, the quota was a limit.
In SharePoint Online, it’s an Allocation.

What’s the difference you ask?

Say you have a 1000GB of storage on SharePoint on premise.

With On premise SharePoint, you can allocate a 200gb quota to 10 sites, “over committing” what you actually have. It works because space isn’t ‘reserved’ for that site, it’s just a limit. You’re telling on premise sharepoint “Don’t let any site get bigger than 200gb”.

Take a similar situation on SharePoint Online:

Say you have 1000GB of storage on SPO

You can only allocate 200GB quotas 5 times – each time you do, your total available drops by 200GB so by the 5th one, you have nothing left to give. This is true, even if the sites are empty!

So SharePoint online works a little differently, at least in 2015 it does – maybe one day this article won’t be relevant, but it is today.

What are we to do if we want to give users basically unlimited sized site collections

Now the question: What are we to do if we want to give users basically unlimited sized site collections, but we can’t allocate large numbers to EACH site collection?

Well, here’s what I did – I wrote a script that looks at how much storage each site collection is using, then adjusts it so there is a certain amount of ‘headroom’.

I run the script daily via a scheduled task.

I also have another script that sets up the connection to SharePoint Online which runs first, if you need that part, it’s elsewhere on this site.

The logic is fairly straightforward, but lets do an example:

All sites should be 4GB or more over the size used:

  • An empty site would have 4gb allocated
  • A site using 3gb would have 7gb allocated
  • A site using 10gb would have 14gb allocated.

Make sense?

That logic is pretty simple, take the size of the site, add 4gb to it, that’s it’s allocation.

For performance reasons, it would be great if we weren’t constantly adjusting each and every site, every time we run the script, the $slack setting helps with that.

Here’s the script:

(If you need help scheduling a task, I have a blog post and video here about that. )

write-host "Be sure to connect to SPO first" -foregroundcolor yellow

$headroom = 4000;
$slack = 500;

#this could really be one line, but it's broken out into two for readability
#first, we get all the sites that we need to change the quota for.
# we do this by the formula Site size must be > the quota, minus the headroom
# now if we just did this, we'd likely have to increase every site every time. so we also factor in a slack amount.
#if the desired headroom is say 4000, we'll allow the site to come within 3500 of being full, then make an adjustment to 
# ensure we have 4000 free.

#this first line gets the list of sites we need to work with
$sites = get-sposite -detailed | where {$_.StorageUsageCurrent -gt $($_.StorageQuota - $headroom + $slack)}

#this lets us see what we're doing...
write-host "$($sites.count) sites to work on"
foreach ($site in $sites)
{
 write-host "$($site.url) : $($site.StorageUsageCurrent) of $($site.StorageQuota)"
}

#This line allocates the storage quota, based on the storage in use
#this was timing out
#$sites | set-sposite -StorageQuota $($_.StorageUsageCurrent + $headroom)
foreach ($site in $sites)
{
 $newquota = $site.StorageUsageCurrent + $headroom
 write-host "altering: $($Site.url) used: $($site.StorageUsageCurrent), old Quota: $($site.StorageQuota), new Quota: $newquota"
 $site | set-sposite -StorageQuota $newquota
}


write-host "Done"

– Jack

Script for assigning SharePoint Licenses to Office365

Adding SharePoint licenses to Office 365 can be a bit tricky.

If you add the E3 license, you get EVERYTHING that comes with E3, if that’s what you need, great, but what if you ONLY want SharePoint, and not Lync, email, etc??

I ran into this recently and used a few resources to come up with a script.

This article was really helpful:  http://www.powershellmagazine.com/2012/04/23/provisioning-and-licensing-office-365-accounts-with-powershell/

As was some script work by an awesome guy I work with named Chris.

The tricky thing here is you can’t directly grant just a SharePoint license in MSOL E3…

You have to do it subtractively.

Let me explain…..

Say you have 3 letters, A, B & C

You might expect to add a license for b like this:

Add-license -option B

It doesn’t work that way. (At least not in 2015 when I wrote this)

Instead you have to say:

Add-License -disable A C

No problem you say.

“I’ll just add code to disable A C”

That’s great, until….

Microsoft adds Option D

Now, when you try

Add-License -disable A C

You’ve just assigned a B and D license, when you only wanted to assign a B license.

Now you see the issue….

The solution is not too hard – we can pull a list of all options available, remove the one we want, and then build the disable list from that.

This way we won’t get caught when Microsoft springs options EFGHI on us.

The full script is below.

Note: there are some unused functions in the script for setting a password – if you have brand new users to Office 365, they may never have used their identity and will need the password reset and sent to them, if that’s the case, just add the call to Reset-Password -upn $upn at the appropriate place(s)

Here’s the script:

#http://sharepointjack.com
#based on content from http://www.powershellmagazine.com/2012/04/23/provisioning-and-licensing-office-365-accounts-with-powershell/
#use at your own risk, while this has worked for me, you should always test in a test environment and understand what it is the script is doing before using it.


write-host "Don't forget to connect to MSOL first!" -foregroundcolor yellow
Start-transcript 
function main()
{
    #variables used in the program
    $script:MissingUsers = @()
	$script:SMTPServer = "YOUR.SMTP.ADDRESS.COM"
	$importFilename = "_SPOUserList.txt"
	$LicenseType = "TENANTNAME:ENTERPRISEPACK"
	$SubLicense = "SHAREPOINTENTERPRISE"

	$path = $(get-location).path
	$userlist = get-content -path "$path\$importfilename"

	foreach ($upn in $userlist)
	{
	    	$upn = $upn.trim()
		
		#note the continue statement on next line, this skips the rest of the loop if the user is not found.
		if ((Check-UserExists -upn $upn) -ne "YES") {write-host "skipping $upn" -foregroundcolor black -backgroundcolor yellow; continue}
	    if ((CheckUserHasPrimaryLicense -upn $upn -PrimaryLicense $LicenseType) -eq $true)
		{
			#user has E3 license
			Write-host "User $upn has $LicenseType License, adding $SubLicense SubLicense"
			Add-SubLicense -upn $upn -PrimaryLicense $LicenseType -SubLicense $SubLicense
		} else {
		    #user has no license of any kind, but is still provisioned in MSOL
			write-host "User $upn does not have a license for $LicenseType adding now"
			Assign-NewLicense -upn $upn -Location "US" -PrimaryLicense $LicenseType -SubLicense $SubLicense
			
		}	
  #note, if you need to reset the users password and email that to them, add a line such as:
  # Reset-Password -upn $upn
	}	
    
	Report-MissingUsers   #report the names of any missing users so they can be investigated	
}#end main

##---------------------------------------------------------------------
##  Utility Functions from here down
##---------------------------------------------------------------------


##---------------------------------------------------------------------
## this function checks the upn (email address) to see if they exist at all in MSOL
## typically if they don't, there is a misspelling or other problem with the name and we want to report on that...
##---------------------------------------------------------------------
function Check-UserExists ($upn)
{
   $spouser = get-msoluser -user $upn -erroraction silentlycontinue
   if ($spouser -eq $null)
   {
       Write-host "user >$upn< Not found in MSOL" -foregroundcolor DarkRed -backgroundcolor Gray
	   $Script:Missingusers += $upn
       return $false 
   }
   else
   {
       return $true
   }
}

##---------------------------------------------------------------------
## this function checks the upn (email address) to see if it has the passed primary License (For example TENANTNAME:ENTERPRISEPACK)
## it returns true if the user has this license, and false if they do not.
##---------------------------------------------------------------------
function CheckUserHasPrimaryLicense ($upn, $PrimaryLicense) 
{
	$ReturnValue = $false
	$spouser = get-msoluser -user $upn
	$count = $($spouser.Licenses | where {$_.AccountSkuId -EQ $PrimaryLicense}).count
	write-host "Found exactly $count Licenses that matched $PrimaryLicense for user $upn" -foregroundcolor yellow
	if ($count -eq 1) 
	{ $ReturnValue = $true }
	return $ReturnValue
}

##---------------------------------------------------------------------
## this function Adds a given SubLicense (for example SHAREPOINTENTERPRISE) 
##  to a users Pre-Existing License (for example TENANTNAME:ENTERPRISEPACK)
##---------------------------------------------------------------------
function Add-SubLicense($upn, $PrimaryLicense, $SubLicense)
{
	$spouser = get-msoluser -user $upn
	#assemble a list of sub-licenses types the user has that are currently disabled, minus the one we're trying to add 
	$disabledServices = $spouser.Licenses.servicestatus | where {$_.ProvisioningStatus -eq "Disabled"}  | select -expand serviceplan | Select ServiceName | where {$_.ServiceName -ne $SubLicense}
	
	#disabled items need to be in an array form, next 2 lines build that...
	$disabled = @()
	foreach  ($item in $disabledServices.servicename) {$disabled += $item}
	
	write-host "  Adding Sub-license $SubLicense to existing $PrimaryLicense License to user $upn" -foregroundcolor green
	write-host "    Disabled License options: '$Disabled'" -foregroundColor green
	
	$LicenseOptions = New-MsolLicenseOptions -AccountSkuId $PrimaryLicense -DisabledPlans $disabled
	set-msoluserlicense  -userprincipalname $upn -licenseoptions  $LicenseOptions
}

##---------------------------------------------------------------------
## this function Assigns a new Primary License ($PrimaryLicense) and SubLicense to a users MSOL account
##---------------------------------------------------------------------
Function Assign-NewLicense($upn, $Location, $PrimaryLicense, $SubLicense)
{
    #assemble a list of sub-licenses available in the tenant, we want to disable all but our target sublicense
	$disabledServices = get-msolaccountsku | Where {$_.accountSkuID -eq $PrimaryLicense} | Select -expand "ServiceStatus" | select -expand "ServicePlan" | select ServiceName | where {$_.ServiceName -ne $SubLicense}
	
	#disabled items need to be in an array form, next 2 lines build that...
	$disabled = @()
	foreach  ($item in $disabledServices.servicename) {$disabled += $item}
	
	write-host "  Adding Completely new $PrimaryLicense license with $SubLicense sublicense for user $upn " -foregroundColor cyan
	write-host "    Disabled License options: $Disabled" -foregroundColor cyan
	
	$LicenseOptions = New-MsolLicenseOptions -AccountSkuId $PrimaryLicense -DisabledPlans $Disabled
	Set-MsolUser -UserPrincipalName $upn –UsageLocation $Location 
	Set-MsolUserLicense -User $Upn -AddLicenses $PrimaryLicense -LicenseOptions $LicenseOptions

}


##---------------------------------------------------------------------
## This function changes the MSOL users password and
## emails the user the temp password and some basic instructions
##---------------------------------------------------------------------
Function Reset-Password($upn)
{
	#generates a random password, 
	#Changes the MSOL Password,
	#emails the user the temp password and some basic instructions
	
	$tempPassword = Generate-Password
	Set-msolUserPassword -UserPrincipalName $upn -NewPassword $tempPassword
	$to = $upn
	$cc = "adminemail@yourdomain.com"
	$from = "adminemail@yourdomain.com"
	$Subject = "Important: Temporary password for your SharePoint Online Account"
	$body =  "Hello, <br/><br/>    You've just been granted a license for SharePoint Online.<br/><br/>"
	$body += "Your user ID is  <b>$upn</b> and your Temporary Password is <b>$TempPassword</b><br/>"
	
	$body += "Please log on to <a href='http://portal.office.com'>http://portal.office.com</a> <b>right now</b> and change the temporary password above to one you'll remember.<br/><br/>"
	
	write-host "Sending email"
	Send-MailMessage -From $from -to $to -cc $cc -Subject $subject -bodyashtml $body -SmtpServer $script:SMTPServer	
	Write-host "Email sent to $upn with $tempPassword"
}

##---------------------------------------------------------------------
## This function generates a random password
## 17 chars long with guaranteed min of 1 number, 1 lower and 1 upper case 
##---------------------------------------------------------------------
Function generate-Password
{
	$alphabetUpper = $NULL;
	for ($a=65; $a -le 90; $a++)
	{
		$alphabetUpper+=,[char][byte]$a 
	}

	$alphabetlower = $NULL;
	for ($a=97; $a -le 122; $a++)
	{
		$alphabetlower+=,[char][byte]$a 
	}

	$ascii=$NULL;
	For ($a=48;$a -le 122;$a++) 
	{
		$ascii+=,[char][byte]$a
	}

	$Fullset=$null
	For ($a=48;$a -le 57;$a++)  #0-9
	{
		$Fullset+=,[char][byte]$a
	}
	For ($a=65;$a -le 90;$a++) #A-Z
	{
		$Fullset+=,[char][byte]$a
	}
	For ($a=97;$a -le 122;$a++) #a-z
	{
		$Fullset+=,[char][byte]$a
	}

	$onepassword = $null
     #start password with an alphabetical letter.
	 $onepassword += (get-random -InputObject $alphabetlower)
	 $onepassword += (get-random -InputObject $alphabetUpper)
	 #now add a number to guarantee we have a number
	 $onepassword += get-random -Minimum 0 -Maximum 9
	 
	 
     #now add 14 random chars from the combined set.
	 for ($pwlen=0; $pwlen -le 11; $pwlen++)
	 {
       $onepassword += (get-random -inputObject $Fullset)
     }
	 return $onePassword
}

##---------------------------------------------------------------------
## This function displays/emails any missing user infomation
##---------------------------------------------------------------------	 
function Report-MissingUsers()
{
  if ($script:MissingUsers.length -gt 0)
  {
    write-host " -------------------------------------- "
	Write-host "          The following users were not found in SPO:          " -foregroundcolor magenta -backgroundcolor gray
	$script:Missingusers
	Write-host "          ^^^^^^^^^^^^^^^^^^^^^^^^^^^^^^^^^^^^^^^^^^          " -foregroundcolor magenta -backgroundcolor gray
	
	$to = "adminemail@yourdomain.com"
	$from = "adminemail@yourdomain.com"
	$Subject = "Missing users in last license assignment"
	$body = $script:MissingUsers -join "<br/>"
	
	write-host "Sending email of missing users to $to"
	Send-MailMessage -From $from -to $to -Subject $subject -bodyashtml $body -SmtpServer $script:SMTPServer	
	Write-host "Missing user email sent to $to"
  }
}

main #call main procedure, this line must be the very last line in the file.
Stop-transcript #ok, actually this line must be the very last line...


Create a ShareGate User mapping file between on Premise AD and o365 / Azure AD

We use ShareGate to migrate content.

We recently started using ShareGate to migrate content from On Premise to SharePoint Online.

When I did this, I found that one of our domain’s users kept showing up as errors in ShareGate – it said it could not find the user in SharePoint Online.

ShareGate has a nice feature for mapping users from one system to users in another – but doing this manually to any scale would be pretty time consuming.

Thankfully, ShareGate lets us save the mappings, which are just XML files with a .sgum file extension.

Wouldn’t it be great if there was a way to automate creating a mapping file like this for everyone in the domain at once?

Have a look at the script below, it pulls all the user accounts from an OU in AD, then looks up each user to find them in MSOL (Office 365 Azure AD) Then grabs the o365 display name and makes the mapping . Any user not found is logged so it can be dealt with separately.

The whole thing is written out as a complete .sgum file, ready to import into ShareGate the next time you migrate!

Note I didn’t figure out the XML stuff in a vacuum – I found an article on powershellmagazine.com to be very helpful and noted it in the script.

# sharepointjack.com
# use at your own risk

$users = get-aduser -server server.domain.com -filter * -searchbase "OU=Users,DC=server,DC=domain,DC=COM"

$total = $users.count
$count = 0
$badnames = @()


#--------------------------------------
# from http://www.powershellmagazine.com/2013/08/19/mastering-everyday-xml-tasks-in-powershell/
$dt = get-date -format "yyyyMMdd"
$path = "$(get-location)\UserMap_$dt.sgum"
$XmlWriter = new-object System.XML.XMLTextWriter($path, $null)
$XmlWriter.Formatting = 'Indented'
$xmlwriter.Indentation = 1
$XmlWriter.IndentChar = "`t"


#write the header
$xmlWriter.WriteStartDocument()

$XmlWriter.WriteComment("Start of XML")
$XMLWriter.WriteStartElement('UserAndGroupMappings')
$XmlWriter.WriteAttributeString('xmlns:xsd', 'http://www.w3.org/2001/XMLSchema')
$XmlWriter.WriteAttributeString('xmlns:xsi', 'http://www.w3.org/2001/XMLSchema-instance')


$XMLWriter.WriteStartElement("Mappings")
$XmlWriter.WriteComment("Start of main loop")
foreach ($OneUser in $users)
{ 
    $count ++
    $XMLWriter.WriteStartElement("Mapping")
    $SourceAccountName = "DOMAINGOESHERE\$($OneUser.Samaccountname)"
    $SourceDisplayname = $OneUser.name

    $DestinationAccountName = "i:0#f|membership|$($OneUser.UserPrincipalName)"
    #pull the destination user name from MSOnLine
    $DDN = $(get-MSOLuser -userprincipalName $OneUser.UserPrincipalName).Displayname
    #if MSOL not found, length will be zero. in that case use the AD displayname
    if ($DDN.length -eq 0)
    {
       $DestinationDisplayname = $OneUser.name
       $badnames += $OneUser.userprincipalName
       write-host "Warning: $($OneUser.userprincipalName) username Not found in MSOL" -foregroundcolor cyan
    }
    else
    {
       $DestinationDisplayname = $DDN 
       write-host "$count of $total"
    }
 
    $XMLWriter.WriteStartElement("Source")
    $XmlWriter.WriteAttributeString('AccountName', $SourceAccountName)
    $XmlWriter.WriteAttributeString('DisplayName', $SourceDisplayname)
    $XmlWriter.WriteEndElement() #source

    $XMLWriter.WriteStartElement("Destination")
    $XmlWriter.WriteAttributeString('AccountName', $DestinationAccountName)
    $XmlWriter.WriteAttributeString('DisplayName', $DestinationDisplayname)
    $XmlWriter.WriteEndElement() #Destination
    $XmlWriter.WriteEndElement() #mapping
}
$XmlWriter.WriteEndElement() #mappings
$XmlWriter.WriteEndElement() #UserAndGroupMappings


#finalize the document
$xmlWriter.WriteEndDocument()
$xmlWriter.Flush()
$xmlWriter.Close()

$bnpath = "$(get-location)\BadNames_$dt.txt"
$badnames | out-file -filepath $bnpath
notepad $path

– Jack

Add a person as a site collection administrator to every Office 365 Site / SharePoint Online Site Collection

The Problem:

In SharePoint online (at least as of early 2015) site collection administrators have to be granted on a site by site basis.

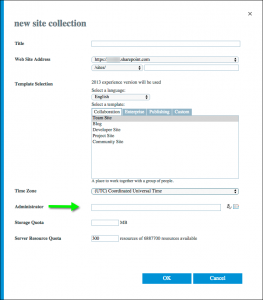
When you create a new site collection using  https://yoururl-admin.sharepoint.com, you are only allowed to pick ONE administrator for the Site collection (In on premise, you used to pick two)

NewSiteCollectionSPOdialog

Now a little trick you can use is, after the site collection is created, you can check the site collection then click the “owners” tab:

SPOadminBar

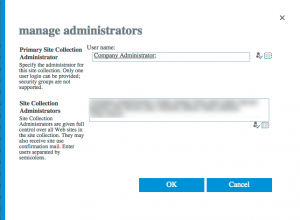
and from that screen you can add as many site collection administrators as you’d like:

AddSPOadminDialog


But there is a downside, you can’t “select all” on all your site collections and add a user to all site collections at once.

Now, I hear you saying “Jack: What if I have 500 site collections and we add a new member to our team?” There’s got to be a better way, right? And it turns out, there is.

The Solution: PowerShell…

A Quick note before we get to the script: You’ll need the SharePoint Online Management Shell installed on your PC before this will work.
Here’s a quick overview of how to use the script:

Update all the relevant variables:

  1. Admin site URL ($adminurl), and the $username that has permissions to log into the admin site url to make the change.
  2. put in your $tenantURL
  3. Update the list of $SiteCollectionAdmins with the list of users you want to make site collection admins

Run the script.

When you run the script it will try to logon to your SPO account and will prompt you for your SPO password, then you should see some slow and steady progress as it runs through each site collection. Finally, at the end you can review the log file to see if there were any issues.

The Script:

# Jack Fruh - sharepointjack.com
# add a user or users to the site collection admin role on every site collection in Office 365 sites (SharePoint Online)

#setup a log path
$path = "$($(get-location).path)\LogFile.txt"
#note we're using start-transcript, this does not work from inside the powershell ISE, only the command prompt

start-transcript -path $Path
write-host "This will connect to SharePoint Online"

#Admin Variables:
$Adminurl = "https://yoururl-admin.sharepoint.com"
$username = "your@email.com"

#Tenant Variables:
$TenantURL = "https://yoururl.sharepoint.com"

$SiteCollectionAdmins = @("firstuser@yourdomain.com", "seconduser@yourdomain.com", "etc@yourdomain.com")

#Connect to SPO
$SecurePWD = read-host -assecurestring "Enter Password for $username"
$credential = new-object -typename System.Management.Automation.PSCredential -argumentlist $username, $SecurePWD

Connect-SPOService -url $Adminurl -credential $credential
write-host "Connected" -foregroundcolor green


$sites = get-sposite
Foreach ($site in $sites)
{
    Write-host "Adding users to $($site.URL)" -foregroundcolor yellow
	#get the owner group name
	$ownerGroup = get-spoSitegroup -site $site.url | where {$_.title -like "*Owners"}
	$ownertitle = $ownerGroup.title
	Write-host "Owner Group is named > $ownertitle > " -foregroundcolor cyan
	
	#add the Site Collection Admin to the site in the owners group
	foreach ($user in $SiteCollectionAdmins)
	{
		Write-host "Adding $user to $($site.URL) as a user..."
		add-SPOuser  -site $site.url -LoginName $user -group $ownerTitle
		write-host "Done"
		
		#Set the site collection admin flag for the Site collection admin
		write-host "Setting up $user as a site collection admin on $($site.url)..."
		set-spouser -site $site.url -loginname $user -IsSiteCollectionAdmin $true
		write-host "Done"	-foregroundcolor green
	}
}
Write-host "Done with everything" -foregroundcolor green 
stop-transcript


Is ‘SharePoint Online’ becoming ‘Office 365 Sites’?

There’s been a bit of chatter for some time now about the future of SharePoint.
An article over a year ago portrayed SharePoint as a technology Stack, much like .net

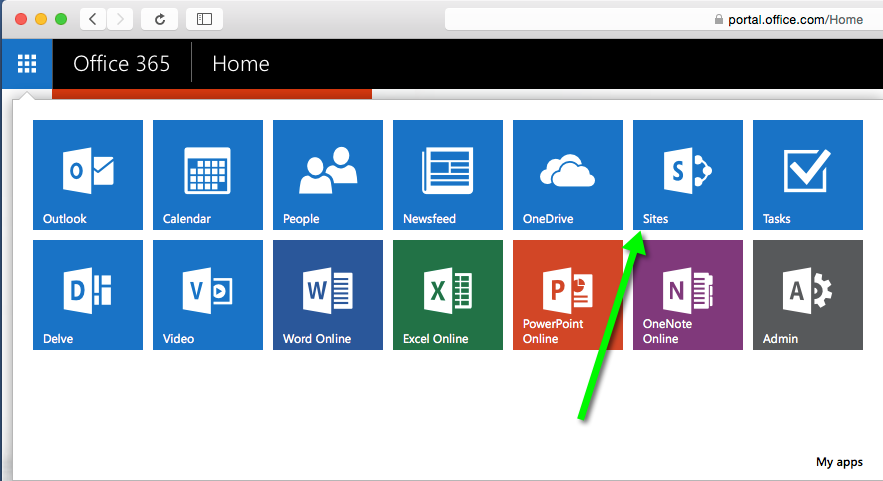
I couldn’t help but notice in my office 365 site, that SharePoint “Sites” aren’t actually branded “SharePoint” in the panel now:
Office365Portal_Dec_12_2014

See that?
Every other branded product has its brand name.
We see “Excel Online” not “Spreadsheet”
OneDrive is there.
So is Delve

And both PowerPoint Online and and OneNote Online use two lines to describe what those do.
In fact, there are exactly the same number of characters in the word “PowerPoint” as there are in “SharePoint”

Lets look at one more thing…
See that tile with the “V” – that’s not Visio, it’s Video, you know, Office 365 Video:

Office365VideoTitle

Now, if “Video” by itself means “Office 365 Video”, does it follow suit that “Sites” by itself means “Office 365 Sites”?

Lets look at a few more things in the o365 interface.
When I clicked on “Sites” the first time, I got this screen:
Office365Sites_screen1
Now here we can relax, Microsoft hasn’t rolled Sites into OneDrive. If you note the url, you’ll see it’s going to a mysite location. It’s the first time I’ve used this tenant, and mysites have never been setup for the user that I’m using.

After the mysite was setup, I went back to the first screenshot, and again clicked on the “Sites” link.
This time I came here:
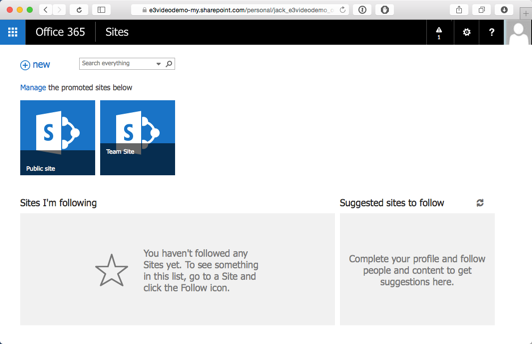
Office365Sites_screen2
Now lets take a moment and examine that screen shall we?

  • There’s no mention of SharePoint…
  • Those familiar with the SharePoint 2013 branding might recognize the “S>” logo.
  • Those familiar with SharePoint infrastructure might notice that the URL is a SharePoint MySite.

If that’s a mysite, maybe the “team site” is different?

Curious, I had to create a standard old “team site” and see what it looked like – I did this in the SharePoint online admin panel (yes that’s still there, under the hood) Note, that I did this before the above screenshot was taken, which is why you see “Public Site” and “Team Site” in the screenshot.

Ok so what does a “Team Site” look like?
Office365Sites_TeamSite

See the word SharePoint anywhere on that screenshot?
I didn’t think so.
I even brought down the settings menu to see if there was any mention of it. (no)

Times they are a changing. If I didn’t know any better, I’d say that the SharePoint Brand Name is on it’s way out.
Is it time to rethink the “SharePointJack” brand as well?