Category Archives: SP2013

I’m presenting at SPFest Chicago – December 8th-10th 2014

I’m excited to be a part of SP Fest Chicago 2014 this year with two sessions:

“SharePoint PowerShell Time Machine”
On Tuesday December 9th at 11:20am.

In this session I share scripts that will either save you time, or in some cases, allow you to go back in time. For example, there’s a script that enables versioning on every document library in your farm. Another that logs basic permissions, and as many other handy scripts as I can fit into a 70 minute session!

“Advanced Introduction to PowerShell Scripting”
On Monday December 8th 8:30am-Noon with co-host Michael Blumenthal

This 100-200 level half day workshop will introduce you to PowerShell in a way that you can use the very next day at work. We’ll quickly cover the basics of PowerShell, then demonstrate some real world scripts used to solve day to day problems in the life of a SharePoint Administrator. We then deconstruct a script- and show you “how we figured it out” – showing the process of starting a script from scratch, and the explorative process used to figure out what to put in a script when you have no idea how at the beginning (and without using Google!) Along the way we explain and demonstrate the features of PowerShell that make things fun! There is something for everyone – new PowerShell users will be on the fast-track to using PS in day to day work. more experienced PS users benefit from seeing real-world scripts and hearing how others go about solving problems. We even have a few tricks that will save time for developers! 

I hope to see you there!

– Jack

SharePoint ULS logs Tips, Tricks, and Thoughts

ULS logs are where SharePoint logs what’s happening, they are plain text files.

Here are a few thoughts on optimizing your workflow when dealing with the ULS logs.

#1 – Know where your logs are.

In Central administration, under Monitoring->Diagnostic Logging, you can set the path for the ULS logs – this sets the path for EVERY server in your farm, so you’ll need to ensure the drive letter exists and has space on EACH server. In general, you don’t want these on the C: Drive, which unfortunately, is the default. I put them in a folder called d:\Sharepoint_Logs

#2 – Don’t log more than you need to!

ULS log files can be HUGE – on the Diagnostic Logging screen (Central admin->Monitoring->Diagnostic Logging) consider doing the following:

  • Under “Event throttling” select “All Categories” then pull the drop downs in that section to “Reset to Default”
  • Under the “Trace Log” area, set the number of days to something reasonable – Ie decide how far back you’d be willing to go to look at a problem, in many cases, 7 days should be sufficient.
  • Under the “Trace Log” area, Restrict Trace Log Disk Space – My Log drive is 80GB, but it’s also shared with a few other logs like the usage logs, and some CSV’s I generate with PowerShell – so I limit ULS logs to 40GB

#3 – Use the ULS Log Viewer.

There have been several of these types of viewers made, but there is “the one” that everyone always uses and that’s available here: http://www.toddklindt.com/ulsviewer

This used to be on Codeplex, but sadly, it wasn’t updated and Codeplex auto-deleted it. Todd was gracious enough to put a copy on his site so others can continue to use this great tool.

Personally, I keep a copy of the ULS Log Viewer right in the folder with the ULS logs- that way it’s nice and handy.

What the ULS logviewer does, is parse the log file and display it in a very user friendly way – I used to use Notepad++ to look at the logs and this is much much better for logviewing.  It has the option of opening a log file, or of opening the ULS logs in real time. One nice thing about it, is it seems to “Know” where your ULS logs are, so you can open the current one without having to go through a bunch of mouse clicks. It’s also great at letting you filter the logs, for example, seeing only the critical events.

#4 – PowerShell related ULS commands

There are a few PowerShell commands for the ULS logs that can be handy to know about. This MSDN page talks about all of them, below you’ll find a few that I’ve personally used with a longer explanation than whats on MSDN.

Merge-SPLogFile

What this one does, is combines all the ULS log file entries from all the servers in your farm, and merges them down to a single file on the box where the command was run – very helpful for tracing issues between boxes on your farm.

There are a lot of ways to use the command so try get-help Merge-SPLogfile -detailed to get the finer details (In particular, note the -starttime and -endtime parameters so you are only merging managable amounts of data!)

Also a quick search found this great article by Cecildt with screenshots and lots more detail than I have here: http://cecildt.blogspot.com/2012/10/sharepoint-2010using-merge-splogfile-to.html

New-SPLogFile

This command Closes the current ULS log file and starts a new one. To my knowledge it only does this on the server where you’ve run the command (ie if you have 3 servers, you’ll need to run on each one)  I’ve used this before when looking at a system in real time with a support person from MS- We ran this command to reset the log file, then recreated a problem, then ran the command again – and what we were left with was a very nice small ULS log that was reasonably timeboxed around the event we were investigating. We could have done the same with Merge-SPlogfile by setting times, but that command is slower, and we would have needed to jot down the start and end times.  In other words, New-SPlogfiles doesn’t do anything you couldn’t do with other tools, it just makes it easier under the right circumstances.

– Jack

Active Directory Migration Woes (Part 1)

The company I work for is undergoing a very long Active Directory migration project.
The result of which has included duplicate users in multiple domains, issues with Sid History, users not showing up in SharePoint, etc…

We’ve tried lots of things to work around the state of AD and one article was pretty critical for us:

http://blogs.technet.com/b/craigf/archive/2012/10/15/sharepoint-and-sid-history-not-playing-well-together.aspx

The true gem of the article isn’t the article itself, it’s in the comments from Brandon on the 17th of May 2013:

This is covered in the August 2012 CU (Note, this is also part of 2010SP2) … when you run this command: STSADM -o setproperty -pn HideInactiveProfiles -pv true it will bypass disabled accounts and query the active domain.

(Interestingly, that propertyname doesn’t show up when you invoke help on STSADM -o getproperty)

For some more background on what we did,

Our AD team made copies of all user accounts from “OLDDOMAIN” to “NEWDOMAIN” these copies also included “SidHistory” When this happened what we observed was it became impossible on SP2013 to pick an “OLDDOMAIN\user” – they would only show under “NEWDOMAIN\user” – since our accounts were migrated, but the users themselves were not yet using the migrated accounts (they were still logging on as “OLDDOMAIN\user”) this created a huge problem for the SharePoint team, and thousands of SharePoint users.

Part of the solution was that article, and the other part, was that the AD Team moved the duplicated accounts In “NEWDOMAIN” to a “Holding” Organizational Unit (OU) within AD (that OU was still in NEWDOMAIN), they then asked us for the service accounts we use for SharePoint and Denied access to that OU for those accounts.

The net effect of all of this work is that SharePoint 2013 now behaves as it would if there were not duplicated accounts on our domain. When we search a user, they only show up once, and from the “correct” users domain.

Now eventually, the AD team is going to ask users to start using the accounts in the “NEWDOMAIN” -when this happens, they will pull the account OUT of the “Holding” OU, making them visible to SharePoint, and they will also deactivate the old account in “OLDDOMAIN” which would prevent duplicates from showing up.

All the credit for this solution goes to the AD team I work with for the “Holding” OU and related permissions work, and also to Craig Forester for the Blog post with the original workaround and to Brandon Ryan for posting the property name. I’ve documented it here because it’s been so impactful for us, and wanted to be sure I had a permanent reference in case the original article is ever moved.

-Jack

Cool scripts for documenting your farm.

Update:
When we ran this script on a new environment, it was pretty cool, but in production, it generated some unreasonably large files.

Reader Amy also posted her experiences in the comments below and had a 3GB file!

So this will take some more work – looks like we’ll need to identify what is important, what kind of changed we’d want to track and trim down the script as a result.

Original article:


My awesome co-worker Stevan found this link today and it is such a great find that I wanted to put it here to share with all, plus it helps me find it later!

Basically it’s a PowerShell script that catalogs everything in your SharePoint farm and exports to XML Files

This link is to the 2013 version, but there is a link to the 2010 version on the same page:

http://technet.microsoft.com/en-us/library/ff645391(v=office.15).aspx

My intention is to modify the script so that the output gets placed into folders named Year-Month-Date that way I can create a scheduled task in windows, and run this on a regular basis. Then it’ll be a simple matter of using a tool like Windiff to compare files from one folder to another and I should know quickly what changed.

When I get to that point, I’ll paste the updated code below.

– Jack


Fun configuring Office web apps 2013 (OWA)

Note: This is not a “how to” article on what steps you need to take to configure OWA in 2013, it is a listing of the problems I ran into while configuring mine, and what solutions I found.  If you’re installing OWA, you’ll definitely want to read this, as it will probably help you, but it’s not a step by step how to guide on how to do it…

I ran into a few problems while configuring OWA for use in a new SharePoint 2013 farm today.

The DNS name you pick matters

I wasn’t sure of the architecture of this whole thing and one question was bugging me…

Does the user need direct access to the OWA server? Or do the SharePoint Web Front ends act as a proxy for it?

I setup a config and ran Fiddler on the client with the browser to see what server(s) it connected to – sure enough it connects to the OWA server(s) directly.

This has some implications for us if we’re making this available on the internet…
Think of this for a moment, in 2010, OWA was a “Service Application” – if your user had access to the WFE, SharePoint took care of the rest, even if OWA was on a different box (or boxes) It was Magic.

With OWA2013, you’ll need an external IP address, an SSL certificate your browsers will see as valid, and NLB or an external load balancer if you’re using more than one OWA box.
It also means you’ll want to build your OWA farm with a legit DNS name and not the machine name.

Uninstalling an old config:

First, I had messed around with using HTTP before my certificates were ready.
No Problem, I thought, I’ll just remove that Initial Farm config I had built with New-OfficeWebAppsFarm command, surely there is a Remove-OfficeWebAppsFarm command right?

Wrong.

get-command *office*

The above shows me 3 commands for creating, but only 2 for removing!

Yep, I can use New-OfficeWebAppsFarm, but there is no Remove-OfficeWebAppsFarm!

It turned out to be easy enough, on my one box farm in Dev, I just needed to use

Remove-OfficeWebAppsMachine

Note that if you have more than one machine in the OWA farm, you’d need to run the above command on each box, saving the first one (master) until last.

With that cleared up and was ready to install with my cert.

The next thing I ran into – the new-OfficeWebAppsFarm command wants the “friendly name” of the cert, not the domain name – it was easy enough to figure that out, but it threw me for a loop.

Time for my first OWA farm install!

Here I ran the command below on the first node of OWA:

New-OfficeWebAppsFarm -internalURl https://myurl.com -editingenabled -certificate "Mycertsfriendlyname"

Everything seemed pretty great…

Confirming it works

Except when you’re done, you’re supposed to check that it works by visiting this URL:

https://myurl.com/hosting/discovery

This is supposed to display a nice little snippit of XML – one that looks familiar if you’ve ever pulled up a web service in a browser.

Instead I got an error.

HTTP Error 500.21 – Internal Server Error
Handler “DiscoveryService” has a bad module “ManagedPipeLineHandler” in its module list

It looked like asp.net wasn’t registered.

I searched the error, and found this article: http://consulting.risualblogs.com/blog/2013/04/03/office-webapps-deployment-error/

bottom line, I ran this command:

c:\windows\Microsoft.net\framework\v4.0.xxxx\aspnet_regiis.exe -ir

and that re-bound ASP.net to IIS.

So far so good, the page was coming up now on the first node.

Adding a second OWA server

Now time for the second node.

To add a 2nd-99th OWA node, the command is a little different:

New-OfficeWebAppsMachine -MachineToJoin myowaurl.com

Here, I ran into one more issue – kinda simple but an “of course!” kinda moment.

When I ran the command the first time, it couldn’t find the OWA server to connect to.

Care to guess why?

Because these are all behind a load balancer, I had host entries on both OWA servers that pointed back to themselves. This is common so that you can log on to one server and confirm THAT server is working.  Well, I got ahead of myself here, and the new-officewebappsmachine command was being redirected back to itself.

Not-going-to-work

Easy fix, I pointed the host entry to the other server long enough to do the command, then set it back so I could test it locally.  I’m glad I did that, because the second node had the same problem as the first, something I might not have found without the host entry.
I ran that aspnet_regiis.exe -ir command a second time, and did an IIS reset and things were looking good on my second OWA node.

Oh and one more goofy thing I noticed…

Configuring SP to talk to OWA

No OWA build is complete until it’s registered with SharePoint 2013 so SP knows where to send the traffic.

To do this, on the SharePoint server we run this command:

New-SPWOPIBinding -Servername urltoyourserver.com

Now what’s odd here, is it rejected my server name multiple times.

It did not like:

  • “Https://myurl.com/”
  • https://myurl.com
  • “Myurl.com” (I don’t know if I actually tried this one)

What worked was just using myurl.com – no quotes, no https://

As soon as I finished the stuff above, I thought I was ‘done’ after all, the commands worked so OWA must work now right?

Kinda.

Don’t test OWA with the System account

I ran into a few more issues when I tried to test this. Remember that bit above, where I said on each OWA server, I had put in a host entry so that I could log on to the server, and test just that server? Well, I was logging on to the server as the SharePoint “System Account” – and guess what? That doesn’t work.  Now you might expect a nice error that says something like “You can’t use this as the system account” – Nope. Just a nice correlation ID to go hunt down.  And in the ULS logs what do we see? Well, nothing that indicates that I can’t use the admin – I dug it up the solution by searching the web.
So I tested with a different account which solved one problem, but it still wasn’t working…

Make sure the individual WOPI bindings match the overall zone

You configure the connection between SharePoint and OWA on the SP box by using commands like this:

New-SPWOPIBinding –ServerName dnsnameof.yourserver.com
write-host "Setting Zone"
Set-SPWOPIZone -zone "External-HTTPS"

Now, you might ask, how did I choose the zone?  There are 4 choices, and somewhere I read that if this site is going to be available internally and externally, use “External-HTTPS”

Not so fast..

As it turns out there’s another command that’s relevant here:

Get-SPWOPIBinding

This will list out a bunch of individual bindings for each file type.
Guess what those bindings said? Internal-HTTPS.

Another search on the internet and yeah, these should have been the same as the overall zone set by the Set-SPWOPIZONE command I used above.

Wanting a “quick win” it seemed faster to change the overall zone by reissuing the set-SPWOPIZone command than to figure out how to update 185 bindings. I ran this:

Set-SPWOPIZONE -zone "internal-https"

And guess what??

OWA works now.

Ok, so that sums up my first few installs of Office Web Apps 2013 and tying them to SharePoint 2013 in a multi-server OWA farm.

That’s a lot of material, lets see if i can sum this up with a nice bulleted list:

  • Use a real DNS name for your OWA box, not the machine name.
  • It’s possible to remove an OWA farm config, even though there is not a “remove-OfficeWebAppsFarm.
  • Don’t put host entries on your OWA boxes until after you’re done with the install.
  • When configuring the WOPI bindings on the SharePoint farm, don’t use https:// in the DNS name.
  • make sure the zone listed for each binding matches the zone set for the the overall connection.
  • When you test OWA, don’t use the Farm account.

– Jack
Customize the SP2013 blue bar

I don’t often do a ton of link spam, but this was a great article that came up on the SPYam discussion board the other day and it was worth jotting down so I wouldn’t loose track of it.

Ryan Dennis over at Sharepointblog.co.uk figured out that the html snippet used to display the word “SharePoint” is actually an editable property of the web application, named SuiteBarBrandingElementHTML

So this would let you see it and or update it:

$app = get-spwebapplication $url
$app.SuiteBarBrandingElementHTML

Ryan wrote a nice little wrapper function around this so please give his blog a visit!.

http://www.sharepointblog.co.uk/customizing-the-sharepoint-2013-suite-bar-branding-using-powershell

 – Jack

Troubleshooting Bad AD accounts and people picker issues in Central admin while granting Site collection admin rights

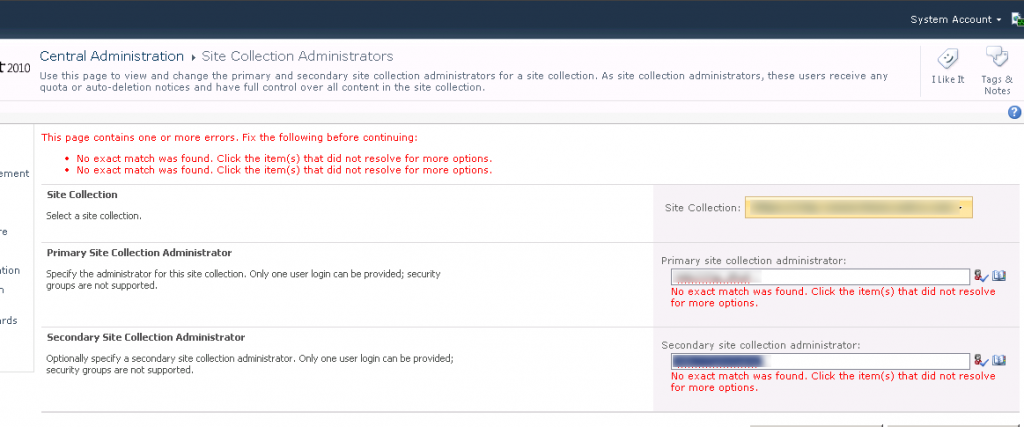
I had a strange problem today – While trying to set a site collection admin via central administration on SharePoint 2010, The existing user ID’s were both underlined with a red squiggly line, and trying to pick new names in people picker resulted in no results.

image001

At first I suspected the CA box had maybe been dropped from the domain or some other AD related issue.

But further investigation showed that other web apps on the same farm were fine.

Additionally, From the web app itself, I was able to select users in the people picker and they worked just fine, So the problem was only with the people picker in central admin, and only for this one specific web application.

I asked around on the SPYam forum on Yammer, and also at SharePoint-Community.net.

I got some great dialog going within a few minutes –

Adam Larkin asked if I had been using IE 10 – He had seen issues caused by IE – I was using IE 10 but this didn’t turn out to be the issue in this case.

Jasit Chopra suggested that I check Authentication mechanism – but this was set to NTLM, and was the same between the working and non-working site,

Paul Choquette – suggested I compare web.configs – another great suggestion – It didn’t turn up anything however.

Vlad (one of the founders of SharePoint-Community.net) also chimed in.

So far so good, No solution yet, but narrowed it down quite a bit. I always appreciate any help troubleshooting – sometimes just talking about things leads to a resolution.

Over on Yammer I had asked the question as well, and Trevor Seward had the suggestion to check the people picker settings. Combining Trevor’s suggestion along with Pauls, I compared PeoplePicker settings between a working web app and the non-working web app and found that the “broken” one had something in the ActiveDirectoryCustomFilter.

Specifically, here’s the powershell I used:

$webapp = get-spwebapplication http://myurl.com
$webapp.peoplepickersettings
#this showed that there was something set in a sub property of peoplepickersettings called ActiveDirectoryCustomFilter.

#next step to fix this was to reset that property, the code below was used:
$webapp = get-spwebapplication http://myurl.com
$webapp.peoplepickersettings.ActiveDirectoryCustomFilter = $null
$webapp.update()

Whats really amazing is that Trevor’s reply on Yammer came from his phone, including the above PowerShell commands!

I think today there were several lessons learned:

1) I know a little more about the people picker settings

2) Reaching out to the community for help can be both engaging and rewarding.

Special thanks to everyone listed above for their help today!

Update: Trevor has a nice article on troubleshooting PeoplePicker related issues at http://thesharepointfarm.com/2014/01/people-picker-troubleshooting-tips/

ShareGate Choice List workaround Script

Update 3/6/2014

This script is no longer needed! ShareGate 4.5 was released and now copies these items natively- no workaround needed!

Hats off to the Share-Gate development team for this update!

The content below should be considered Archive/reference:

If you’re a user of Share-Gate, you may have run into an issue transferring SharePoint lists with Multiple choice fields.

The migrations work, so long as all the data in your list fits into the list of choices you have. But what if at one point the list of choices changed, and you now have data in your list that isn’t in the choice list?

The scenario is like this.
Say you have a choice field with “region”
It started out with North, South, East and West.
So you have data in the list that has those values in it.

Then someone says, “Hey lets restructure – going forward we want people to choose from: East, Central an West”

See what happened there?

The data that’s already in there could be North South East or West, but NEW data can only be West Central or East. This causes issues when the list is migrated.

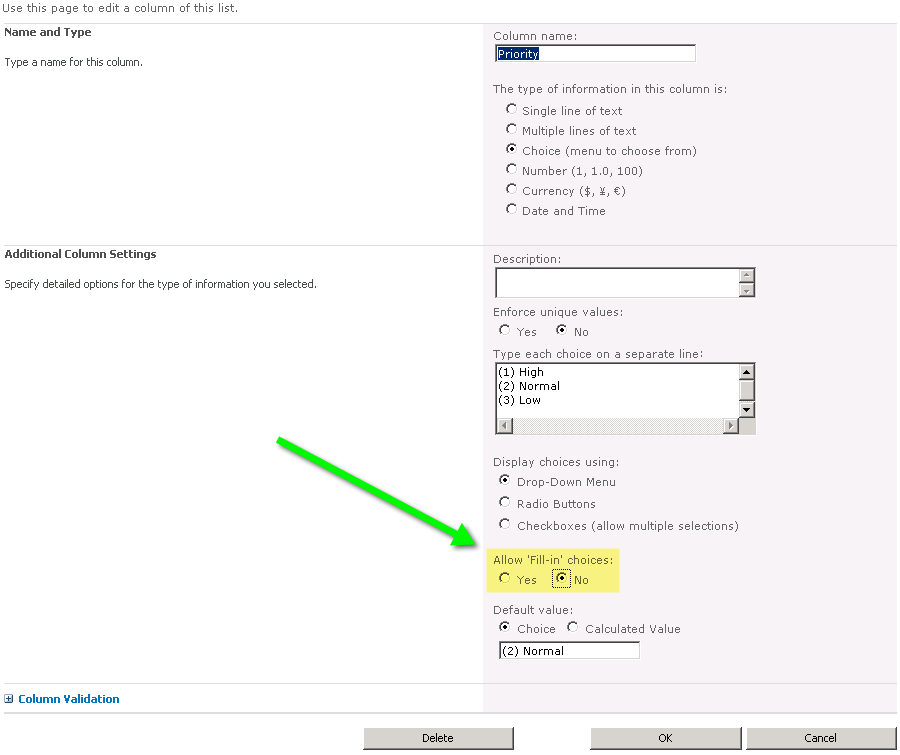
The solution is to temporarily allow “Fill-in Choices:”

Field choices


Ideally, you would change the value “Allow ‘Fill-in’ choices:” above from “no” to “yes” before the migration, then set it back to no after the migration at the new location.

The trouble is,  a given web can have quite a few lists, and each list can have quite a few fields. Going through all of this manually, twice is not fun? What is fun you ask? I’m glad you ask – Running two PowerShell scripts…

I wrote this little PowerShell script…

Here’s what it does –

It enumerates though all the lists in your SP Web.
Then it checks each list to see if has any “Choice Fields” that are set to not allow fill-in choices.
Then it.. sets the Value to yes for “Allow Fill in Values”

How much would you pay for a timesaving script like this???

But wait! There’s more!

While it’s doing all this, its also generating a 2nd powershell script – filled with commands to turn these values back off.

$SourceURL = "https://yoururl.com/sitecollection/web"
$DestinationURL = $SourceURL #Feel free to replace this with the destination, or leave it the same for testing purposes 
$web = get-spweb $SourceURL
$actionweb = get-spweb $SourceURL

#build a "get back" script"
$script = ""
$script = '$web = get-spweb ' + $DestinationURL

foreach ($list in $web.lists)
{
    # get the list of fields with choices that are set to false (Assuming they exist)  
    $fields = $list.fields | where {$_.type -eq "choice" -and $_.FillInChoice -eq $false}
	if ($fields -ne $null)
	{
		write-host "Title: $($list.title)  ($($fields.count))" -foregroundcolor green
		foreach ($field in $fields)
		{
			$f = $actionweb.lists[$list.title].fields[$field.title] 
			$f.FillInChoice = $true
			$f.update()

			$line = '$field = $web.lists["' + $list.title + '"].fields["' + $field.title + '"]; $field.FillInChoice = $false; $field.Update()'
			write-host $line "#" $field.id
			if ($field.id -eq $null)
			{
				write-host "NULL FIELD! $($field.id)" -foregroundcolor yellow
				$field
				write-host "--------------------------------" -foregroundcolor yellow
			}
			$script = $script + "`r`n" + $line
		}#end foreach
	}#end if
}#end foreach

$script | out-file -filepath "Reset_$($DestinationURL)_FillInChoices_$(get-date -format 'yyyyMMdd_HHmmss').ps1"

Note in the above script – I needed two near identical $web objects – the reason for this is that as I went through the list in code, and did my .update() statements, it would invalidate the state of the $web object

Another upside is that the source and destination can be on different farms – just move the generated PS1 file to the destination and run it there.

If there’s a downside, it’s that this really only works for SP 2010 and SP 2013 On premise.

Schedule your PowerShell Scripts using the Windows Task Scheduler

I did a quick (<3min) video showing how to schedule a PowerShell script with the Windows Task Scheduler. Quick note, Assuming you are running a SharePoint related PowerShell, don't forget two things: One, you'll need to include

Add-PSSnapin Microsoft.SharePoint.PowerShell -ErrorAction SilentlyContinue

Also when Saving the script and entering a user account and password – don’t forget this account must have rights to SharePoint.