Category Archives: PowerShell

Using AzureRM Powershell on a Mac

I’ve been watching with excitement ever since the announcement of powershell going open source and coming to multiple platforms like Mac and Linux.

My early experiments with it weren’t too productive – Powershell, with a base set of about 300 commandlets  worked, but all the add-in commandlets I needed to work with Azure did not.

Jessica Dean wrote an article and another about how to install the azurerm.netcore.preview modules with an earlier beta release of powershell for the mac.

Unfortunately, I could not get it to work – I suspect it required a specific alpha or beta version of powershell for mac, as I remember being a version ahead at the time it didn’t work.

Fast forward to today.

Powershell Mac Beta 4 has been available for a few weeks.

UPDATE: PowerShell Mac Beta 5 was released on August 2nd 2017. I’ve tested the steps in the article and they still work with Beta 5.

You can find the download for it here: https://github.com/PowerShell/PowerShell

Scroll down the page and look for the table with all the different installers, and grab the .pkg file. (note that if you hover over it, the filename will show the version:)

In the past I’ve installed the beta without issue, and I’m assuming if you just double click the installer, you’ll be fine.

I always start powershell by opening terminal (a built in mac app) and then typing powershell.

At this point if you type $(get-command).count it’ll return about 300 commandlets.

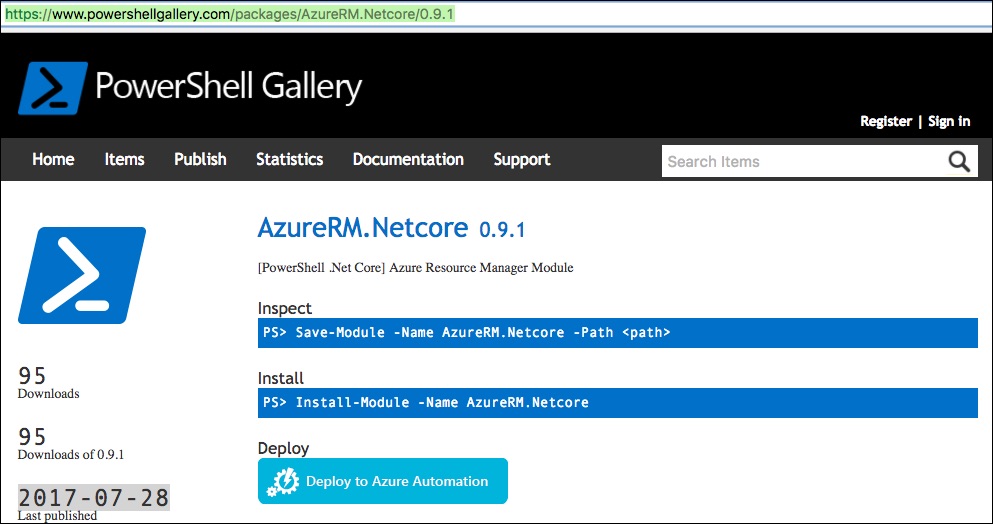
To install the Azure RM extensions, I did a search on the powershell gallery site: https://www.powershellgallery.com looking for azurerm.netcore.

I noticed that one of the search results didn’t have the .preview at the end, like the ones in Jessica’s article. And I noticed that the update date on it was from 3 days ago, this is a good sign!  (Update as of 8-10, Powershell Mac was updated to beta 5, but the AzureRM.NetCore module was still at 0.9.1 – I can confirm this works with beta 5 (though After installing beta 5, I did have to re-install AzureRM.Netcore)


I followed the instructions under install and got an error about not having permissions.

I exited powershell, then was brought back to terminal

Then from terminal I typed:

Sudo powershell

This brought me back into a powershell window, and I was able to run:

Install-Module -Name AzureRM.Netcore

After that. I did a get-command and I now have nearly 900 commandlets!

Next I typed add-azurermaccount and I was able to get in!
(The auth system was a little weird, directing you to open a Url in a separate browser, sign in and copy/paste a code from powershell to the browser window, but it worked!)

This is great improvement!

Now, with proof that things are working, I wanted to confirm it worked without starting powershell with the sudo command.

Sure enough it works fine without it.

In closing, I’ve outlined the steps needed to install powershell and the azureRM extensions on a mac so you can work with azureRM powershell commands on your mac.

Let me know in the comments if this helps!

  • Jack

Powershell script to remove duplicate, old modules

If you’ve installed modules in powershell such as the AzureRM collection, and have updated to newer versions of said modules, it’s possible that you might have both the old and new versions installed. This can slow down some commands in powershell (get-command for example)

I wrote a small script to remove old versions of Powershell modules using what I found at https://windowsserver.uservoice.com/forums/301869-powershell/suggestions/14934876-update-module-needs-flag-to-remove-previous-versio) as a starter.

Note that when I say “Remove old versions” I mean it leaves the most current one you have and removes the older ones – if your system is 3 versions behind, it will not go fetch new commands first (though it does remind you of the command to do that)

write-host "this will remove all old versions of installed modules"
write-host "be sure to run this as an admin" -foregroundcolor yellow
write-host "(You can update all your Azure RM modules with update-module Azurerm -force)"

$mods = get-installedmodule

foreach ($Mod in $mods)
{
  write-host "Checking $($mod.name)"
  $latest = get-installedmodule $mod.name
  $specificmods = get-installedmodule $mod.name -allversions
  write-host "$($specificmods.count) versions of this module found [ $($mod.name) ]"
  
  foreach ($sm in $specificmods)
  {
    if ($sm.version -ne $latest.version)
	{
	  write-host "uninstalling $($sm.name) - $($sm.version) [latest is $($latest.version)]"
	  $sm | uninstall-module -force
	  write-host "done uninstalling $($sm.name) - $($sm.version)"
          write-host "    --------"
	}
	
  }
  write-host "------------------------"
}
write-host "done"

Hope this helps!

Update 3-2018:

The script above was originally missing a -force parameter, this has been fixed.

While troubleshooting the script above, I wanted a fast, non-destructive way to see what modules I had installed that had multiple versions.

I created the script below for that purpose, you may find it useful:

write-host "this will report all modules with duplicate (older and newer) versions installed"
write-host "be sure to run this as an admin" -foregroundcolor yellow
write-host "(You can update all your Azure RMmodules with update-module Azurerm -force)"

$mods = get-installedmodule

foreach ($Mod in $mods)
{
  write-host "Checking $($mod.name)"
  $latest = get-installedmodule $mod.name
  $specificmods = get-installedmodule $mod.name -allversions
  write-host "$($specificmods.count) versions of this module found [ $($mod.name) ]"
  
 
  foreach ($sm in $specificmods)
  {
     if ($sm.version -eq $latest.version) 
	 { $color = "green"}
	 else
	 { $color = "magenta"}
     write-host " $($sm.name) - $($sm.version) [highest installed is $($latest.version)]" -foregroundcolor $color
	
  }
  write-host "------------------------"
}
write-host "done"
  • Jack

Beware! Changes to AzureRM powershell commandlets may break your online scripts!

This week I ran into an interesting problem:

A powershell commandlet failed when run on Azure Automation Services, but it worked for me on my local machine.

It was a simple command

get-azurermsubscription

if you’re not familiar with it, it brings back a list of all the subscriptions you have access to in Azure.

The problem is, it used to return properties named “SubscriptionName” and “SubscriptionID”

These were recently changed to “Name” and “ID” causing code that used the old properties to fail.

This brings to light the importance of keeping your azureRM modules up to date on your local workstation, so you’re testing the same thing. In my case, I was using version 3.8, but 4.1 was current.

My last post listed a few commands of interest for keeping up with installed modules, as a recap, here are a few of interest:

Update-module AzureRM -force #this will fetch the latest versions of all your azureRM.* modules
get-installedmodule #lists installed modules (with a twist - it only shows the highest version you have installed if you have more than one)

One problem I ran into today: After updating all my Modules, powershell was slow as can be.  I had installed updated versions, but hadn’t removed the old ones.

Maybe there is a better way, and if so, please comment below, but I ended up creating a small script to remove prior versions. For findability, that’ll be in my next post.


Some misc powershell commands for working with azure PS modules

This is one of those posts I’m doing mostly for myself to keep things in one place.

Remove an old version of a module:

$Latest = Get-InstalledModule (modulename); Get-InstalledModule (modulename) -AllVersions | ? {$_.Version -ne $Latest.Version} | Uninstall-Module -WhatIf

another way to do the same:

get-installedmodule modname -requiredversion  x.x.x | uninstall-module

(taken from https://windowsserver.uservoice.com/forums/301869-powershell/suggestions/14934876-update-module-needs-flag-to-remove-previous-versio)

Show what modules are installed:

get-installedmodule

Show what versions of a specific module are installed

get-installedmodule -name modname -allversions


Update the azureRM module:

update-module azurerm -force

Install over a stubborn module:

install-module azurerm.cognitiveservices -force


Timewatch, a PowerShell Function for reporting how much time is left in a loop

I had to loop through a bunch of things the other day and wanted to have a nice way to report how far I was through the loop.

This way if I had 1000 things to loop through, and each one took 10 seconds, I knew I had 10,000 seconds to wait, or roughly 2.7 hours.

Armed with this information, I could be comfortable stepping away for a bit with a good guess as to when my script would finish.

function timewatch
{
    param(
	 [int]$totalnumber,
	 [int]$passnumber
   )	
   $now  = get-date 
   $timespan = $now - $script:starttime
   write-host "It's taken $timespan to complete $passnumber iterations ($($totalnumber - $passnumber) iterations remaining)" -foregroundcolor magenta
   
   $timeper = $timespan.TotalSeconds / $passnumber 
   write-host "Thats $($timeper.tostring("#.#")) seconds per change" -foregroundcolor magenta
   
   $remainingSeconds = ($totalnumber - $passnumber ) * $timeper
   $remainingspan = new-timespan -seconds $remainingseconds 
   write-host "Estimated $($remainingspan.hours.tostring("00")):$($remainingspan.minutes.tostring("00")):$($remainingspan.seconds.tostring("00")) (H:M:S) until complete" -foregroundcolor magenta
 
   $eta = $now.addseconds($remainingSeconds)
   write-host "The current eta for script completion is $eta" -foregroundcolor magenta
}

To use the function above, you need to paste it into your script, somewhere above where you intend to call it.

Then in your script you likely have a loop like this:

foreach($thing in $lotsofthings)
{
  #Do something here with one $thing at a time.
}

To make use of the timewatch function, we’ll modify our loop as follows:

$script:starttime = get-date 
$i = 0
foreach($thing in $lotsofthings)
{
    $i++
    #Do something here with one $thing at a time.
    timewatch -passnumber $i -totalnumber $lotsofthings.count
}

That’s it, now the timewatch function will track the average time per iteration, and based on how many remaining interations are left, will report both the amount of time left, and an ETA time that the looping would complete.

Having PowerShell talk to you is actually useful!

PowerShell can talk to you.

My favorite use for it, is when I have a script that’s going to run a long time, say 10-20 minutes.
We all KNOW that we’re not going to sit there and watch the output!

Having PowerShell talk when some condition comes up can be really useful if you’ve relegated the window to the background and are doing something else like reading email.

Doing it was super easy.

ADD-TYPE -AssemblyName System.Speech
$speak = new-object System.Speech.Synthesis.SpeechSynthesizer
$speak.speakAsync("Hello from powershell!") > null


#Example use in real world code..

#Loop through 1000 users
foreach ($userId in $massiveListOfUsers)
{
    $result = Check-user -id $userId
    if ($result -eq $false)
    {
         write-host "OH NO THIS USER IS MISSING"
         write-host $userId
         $speak.speakAsync("Can't find $($userId.FirstName) $($userId.LastName)") > $null
    }
}

Shoutout to Michael Blumenthal for suggesting this!

Modify-Sublicense PowerShell function for modifying Office 365 Sublicenses

Modify-Sublicense

An example call would be:

Modify-Sublicense -upn "joe@yourcompany.com" -PrimaryLicense "TENANT:ENTERPRISEPACK" -SublicensesToRemove @("SWAY","YAMMER_ENTERPRISE") -SublicensesToAdd @("SHAREPOINTENTERPRISE", "SHAREPOINTWAC")

If you’re new to powershell, scroll down past the code below for some additional tips.

Naturally, sublicenses you had before will REMAIN unless you’ve removed them.
AND
Sublicenses you DID NOT HAVE before will NOT BE ADDED unless you specifically add them.

This is important because of how the licensing works, which has been covered in other blog posts my myself and others.

I’ve used the function below as part of a larger script with good results.

As always, TEST BEFORE YOU USE IT!

##---------------------------------------------------------------------
## this function Adds and or removes sublicenses 
## Pass in the -SublicensesToAdd and -SublicensesToRemove as an array ( use $var = @("value", "Value")  )
##  to a user's Pre-Existing License (for example TENANT:ENTERPRISEPACK)
##---------------------------------------------------------------------
function Modify-SubLicense($upn, $PrimaryLicense, $SublicensesToAdd, $SublicensesToRemove)
{
	$spouser = get-msoluser -userprincipalname $upn
	#assemble a list of sub-licenses types the user has that are currently disabled, minus the one we're trying to add 
	$disabledServices = $($spouser.Licenses | where {$_.AccountSkuID -eq $PrimaryLicense}).servicestatus | where {$_.ProvisioningStatus -eq "Disabled"}  | select -expand serviceplan | Select ServiceName 
	
	#disabled items need to be in an array form, next 2 lines build that...
	$disabled = @()
	foreach  ($item in $disabledServices.servicename) {$disabled += $item}
	
	write-host "   DisabledList before changes: $disabled" -foregroundcolor yellow
	
	#if there are other sublicenses to be removed (Passed in via -SublicensesToRemove) then lets add those to the disabled list.
	foreach  ($license in $SublicensesToRemove)
	{
		$disabled += $license 
	}
	
	#cleanup duplicates in case the license to remove was already missing
	$disabled = $disabled | select -unique
	
	#If there are licenses to ADD, we need to REMOVE them from the list of disabled licenses
	# http://stackoverflow.com/questions/8609204/union-and-intersection-in-powershell
	$disabled = $disabled | ?{$SublicensesToAdd -notContains $_}
	
	write-host "    DisabledList after changes: $Disabled" -foregroundColor green
	
    $LicenseOptions = New-MsolLicenseOptions -AccountSkuId $PrimaryLicense -DisabledPlans $disabled
	set-msoluserlicense  -userprincipalname $upn -licenseoptions  $LicenseOptions
}

New to powershell?

Here are a few tips:

  • Since the code is a function, you’ll need to copy-paste it to a script of your own before you can use it
  • In powershell, functions need to appear in your script above/before you use them.
  • There are ways to load the function in memory, so you can call it as if it was a native command. See How to add functions to your powershell session
  • An array in powershell can have zero or 1 or many items, if you need to pass a single value, just pass it as an array with one value. That would look like this: @("Value1", "Value2")

– Jack

Replace an expiring Client Secret in an app for SPO

What are we even calling these things these days? Apps for SharePoint Online? Apps for Office 365?

This article is about the apps we build using the new app model that was introduced along with SharePoint 2013. It’s the main way of developing functionality for SharePoint Online.

The apps are hosted in Azure (or on the hosting provider of your choosing)

When these Apps are created/installed a Client secret is used to ensure that communication between your externally hosted app and SharePoint Online is secure and not coming from an attacker.

Unfortunately these certificates expire.

Ours have.

The article below talks about replacing them.

https://msdn.microsoft.com/en-us/library/office/dn726681(v=office.15).aspx

We also opened a ticket with Microsoft Premier Support which revealed a few more tidbits.

  • It takes like 24 hours for the new certificate to propogate through your system, leaving your app out of commission for at least that long if you don’t renew before it expires.
  • The article above mentions, but does not give an example of, extending the date from the default 1 year to 3 years. I’ve copied some of the correspondence with Mustaq Patel from Microsoft, who helped us through the process (Thanks Mustaq!)

Note for the scripts below, you’ll need your clientID this is in the web.config of your website that’s hosted in Azure.  As luck would have it, the person at our company who would have had this info was on vacation. Since it’s in the web.config of the running app, it made sense to just pull the actual web.config in use. I did this via FTP, using the steps in this article to configure an FTP account to gain access to the server:

https://azure.microsoft.com/en-us/documentation/articles/web-sites-configure/

Update: You can also find the clientID by going to any sharepoint site that uses the app, Site Settings->Site App Permissions.

It’ll be the guid between the last pipe symbol and the @ symbol

Example i:oi.t|blahblahblah|abcdef-1234-this-is-aguid-and-is-what-you-want@7a534-no-the-guid-you-want-123

(thanks to Mustaq for pointing this out!)

  1. Connect to MSOnline using tenant admin user with below powershell in SharePoint 2013 powershell
    import-module MSOnline
    $msolcred = get-credential
    connect-msolservice -credential $msolcred
  2. Get ServicePrincipals and keys. Printing $keys will give 3 records, replace each KeyId in key1, key2 and key3. You can also see EndDate of each key. Confirm if your expired key shows there. Also note that clientId needs to match as per your clientId.

    $clientId = "29b6b386-62a6-45c7-beda-abbaea6eecf2<< CHANGE THIS"
    $keys = Get-MsolServicePrincipalCredential -AppPrincipalId $clientId
    Remove-MsolServicePrincipalCredential -KeyIds @("key1","key2","key3") -AppPrincipalId $clientId
  3. Generate new ClientSecret for this clientID. Please note it uses clientId set in #2. Also ClientSecret is valid for 3 years.

    $bytes = New-Object Byte[] 32
    $rand = [System.Security.Cryptography.RandomNumberGenerator]::Create()
    $rand.GetBytes($bytes)
    $rand.Dispose()
    $newClientSecret = [System.Convert]::ToBase64String($bytes)
    $dtStart = [System.DateTime]::Now
    $dtEnd = $dtStart.AddYears(3)
    New-MsolServicePrincipalCredential -AppPrincipalId $clientId -Type Symmetric -Usage Sign -Value $newClientSecret -StartDate $dtStart  –EndDate $dtEnd
    New-MsolServicePrincipalCredential -AppPrincipalId $clientId -Type Symmetric -Usage Verify -Value $newClientSecret   -StartDate $dtStart  –EndDate $dtEnd
    New-MsolServicePrincipalCredential -AppPrincipalId $clientId -Type Password -Usage Verify -Value $newClientSecret   -StartDate $dtStart  –EndDate $dtEnd
    $newClientSecret
  4. Copy the output of $newClientSecret.

  5. Replace the Web.config with this ClientId and ClientSecret. Please note we don’t need SecondaryClientSecret appsettings.

  6. Wait for 24 hours to propagate ClientSecret to SPO

Come see me at the Microsoft Ignite Conference!

I’ll be at Microsoft Ignite the week of May 4th-May 8th. Mainly as an attendee, but I do have a few “public appearances” scheduled:

Scripting Guys Booth

This year at Ignite the Scripting Guys will have a booth, and have a schedule up on their blog showing when various PowerShell people will be there.

I’m honored to be invited to spend some time in the booth and will be there Monday Night from 7-7:30 if you’d like to say hello.

There are lots of other big names stopping by the booth throughout the conference including Todd Klindt, Mark Minasi, Jeff Hicks, Jeffrey Snover and others!

The full Schedule of guest appearances is being maintained at the Scripting guys blog:

http://blogs.technet.com/b/heyscriptingguy/archive/2015/04/25/weekend-scripter-scripting-guys-ignite-booth-schedule.aspx

Community Theater

On Wednesday from 11:35-11:55 I’m part of CSPUG’s PowerShell Q&A Live in the Community Theater, which I believe is in the expo hall.

I’ll be Joining PowerShell MVP’s Michael Blumenthal and Jeff Hicks to help answer any questions you  have.

These are all really great people in the community, and it’s a huge honor to be sharing the stage with Michael and Jeff in the Q&A panel, and sharing the booth with Ed and Teresa Wilson, along with their rock star cast of PowerShell Super Heroes who will be stopping by the booth throughout the event.

– Jack


Script for Auto-Adjusting Site quotas in SharePoint Online / O365 based on current useage

** IMPORTANT UPDATE #2 -this is no longer needed.

As of September 2015, Site Quotas are no longer needed!

The screenshot below came from our tenant settings screen – Set it to Automatic and forget about site quotas!

AutoStorageSPOnline

** IMPORTANT UPDATE RELATED TO SHAREPOINT / OFFICE 365 VIDEO SITES ** (Updated April 29th 2015)

If you use the script below, you may want to put in a filter to prevent the script from working on any site with the managed path of /portals/

Explanation:

Microsoft recently added Video portals to office 365.

Ours was added this morning.

I looked at it in the admin screen because I was curious what site collections had been created.

I noticed something peculiar: The Storage Quota was 0.

2015-04-29_17-34-23

You can’t set a quota to zero. Not in the UI, not in PowerShell.

Well tonight my script ran and guess what, it reset my quote on the Video portal.

Originally, Video portal storage was supposed to come out of the overall SPOnline allotment, so this may not be a big deal, maybe we needed to set it anyways?

But, since it’s not possible to set zero manually, I wonder if this was one site you didn’t have to manage/pre-allocate storage too? Or maybe MS decided to make storage unlimited?

I’m not really sure, but in the short term, I thought I’d best warn people that there are some unknowns here as it relates to using the below script with Office Video.


AND NOW BACK TO OUR ORIGINAL ARTICLE, as it was published on April 15th:

The year is 2015, You’ve just been given “TONS” of storage on SharePoint online, and someone says “Lets give everyone a 200GB site quota”.

Seems like a great idea, you’ll never run out of space, so why not set the limit high?

Well, it turns out, the word “Quota” has a different meaning in SharePoint Online / Office 365 than it did in SP on Premise.

In the On Premise version of SharePoint, the quota was a limit.
In SharePoint Online, it’s an Allocation.

What’s the difference you ask?

Say you have a 1000GB of storage on SharePoint on premise.

With On premise SharePoint, you can allocate a 200gb quota to 10 sites, “over committing” what you actually have. It works because space isn’t ‘reserved’ for that site, it’s just a limit. You’re telling on premise sharepoint “Don’t let any site get bigger than 200gb”.

Take a similar situation on SharePoint Online:

Say you have 1000GB of storage on SPO

You can only allocate 200GB quotas 5 times – each time you do, your total available drops by 200GB so by the 5th one, you have nothing left to give. This is true, even if the sites are empty!

So SharePoint online works a little differently, at least in 2015 it does – maybe one day this article won’t be relevant, but it is today.

What are we to do if we want to give users basically unlimited sized site collections

Now the question: What are we to do if we want to give users basically unlimited sized site collections, but we can’t allocate large numbers to EACH site collection?

Well, here’s what I did – I wrote a script that looks at how much storage each site collection is using, then adjusts it so there is a certain amount of ‘headroom’.

I run the script daily via a scheduled task.

I also have another script that sets up the connection to SharePoint Online which runs first, if you need that part, it’s elsewhere on this site.

The logic is fairly straightforward, but lets do an example:

All sites should be 4GB or more over the size used:

  • An empty site would have 4gb allocated
  • A site using 3gb would have 7gb allocated
  • A site using 10gb would have 14gb allocated.

Make sense?

That logic is pretty simple, take the size of the site, add 4gb to it, that’s it’s allocation.

For performance reasons, it would be great if we weren’t constantly adjusting each and every site, every time we run the script, the $slack setting helps with that.

Here’s the script:

(If you need help scheduling a task, I have a blog post and video here about that. )

write-host "Be sure to connect to SPO first" -foregroundcolor yellow

$headroom = 4000;
$slack = 500;

#this could really be one line, but it's broken out into two for readability
#first, we get all the sites that we need to change the quota for.
# we do this by the formula Site size must be > the quota, minus the headroom
# now if we just did this, we'd likely have to increase every site every time. so we also factor in a slack amount.
#if the desired headroom is say 4000, we'll allow the site to come within 3500 of being full, then make an adjustment to 
# ensure we have 4000 free.

#this first line gets the list of sites we need to work with
$sites = get-sposite -detailed | where {$_.StorageUsageCurrent -gt $($_.StorageQuota - $headroom + $slack)}

#this lets us see what we're doing...
write-host "$($sites.count) sites to work on"
foreach ($site in $sites)
{
 write-host "$($site.url) : $($site.StorageUsageCurrent) of $($site.StorageQuota)"
}

#This line allocates the storage quota, based on the storage in use
#this was timing out
#$sites | set-sposite -StorageQuota $($_.StorageUsageCurrent + $headroom)
foreach ($site in $sites)
{
 $newquota = $site.StorageUsageCurrent + $headroom
 write-host "altering: $($Site.url) used: $($site.StorageUsageCurrent), old Quota: $($site.StorageQuota), new Quota: $newquota"
 $site | set-sposite -StorageQuota $newquota
}


write-host "Done"

– Jack