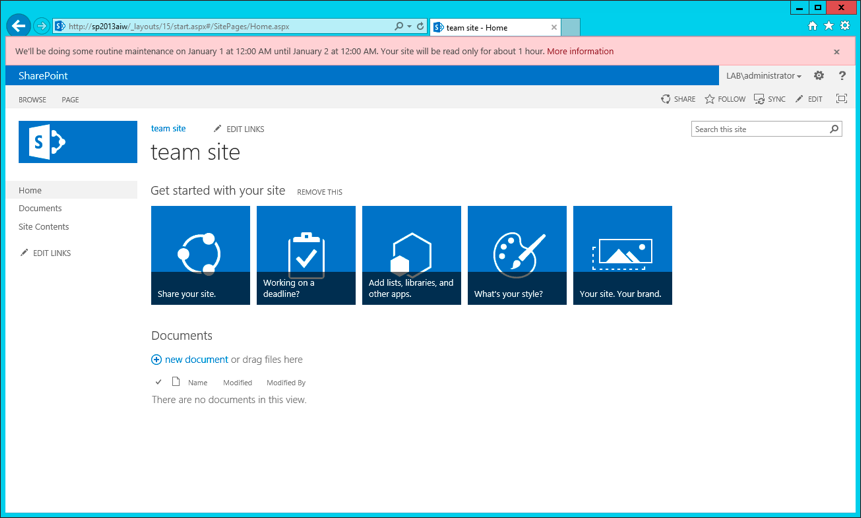
At the SharePoint Conference this week, Session SP210 on upgrading to SP2013 mentioned a brand new feature that didn’t exit in the preview edition: MaintenanceWindows.
As you can see from the screenshot above, this feature puts up a simple banner alerting users of the upcoming work.
The message is localized in the users language so long as language packs are installed.
The “More Information” link can point to any page you specify.
I was pretty excited about this, and couldn’t wait to try it out!
The PowerShell to do this wasn’t as easy as I expected.
I’ve pasted below what worked for me.
 #1st get a content database
 get-SPContentDatabase  #this will list them all
                        #copy and paste a database ID and use it to assign a specific DB to a variable
 $ContentDB = Get-SPContentDatbase -Identity #ID goes here

 #now we're going to add a maintenance window to the SPContentDatabase with $ContentDB.MaintenanceWindows.Add()
 #before we can do that we need to create a Maintenance window object and populate it.

 #                         Parameter List             "MaintanceWarning or MaintanencePlanned",  Mt Start   ,  Mt End   , Notify Start, Notify End, duration , urlforinfo
 $MaintWindow = New-Object Microsoft.SharePoint.Administration.SPMaintenanceWindow "MaintenancePlanned", "1/1/2013", "1/2/2013", "11/16/2012" , "1/3/2013", "1:00:00", "http://www.mydomain.com/outageinfo.html"
    #Parameter List for above:
      #1: MaintanceWarning or MaintanencePlanned,
      #2: Maintenance Start Date
      #3: Maintenance End Date
      #4: Notification Start Date
      #5: Notification End Date
      #6: Duration in the format of DD:HH:mm:ss - "1:00:00" = 1 hour, "1:00:00:00" = 1 day
      #7: URL for info
      # Parameters 2-5 all take a date time in this format: "1/20/2012" or "1/20/2012 5:00:00 PM"

  #Now we can see the properties of a single MaintenanceWindow by just typing in $MW and hitting enter:
  $MaintWindow

  #for me this looked like this:
  # MaintenanceStartDate        : 1/1/2013 6:00:00 AM
  # MaintenanceEndDate          : 1/2/2013 6:00:00 AM
  # Duration                    : 01:00:00
  # NotificationStartDate       : 11/16/2012 6:00:00 AM
  # NotificationEndDate         : 1/3/2013 6:00:00 AM
  # MaintenanceType             : MaintenancePlanned
  # MaintenanceLink             : http://www.mydomain.com/outageinfo.html
  # UpgradedPersistedProperties :

  #ok with that out of the way, we just need to add it to he content database
  $ContentDB.MaintenanceWindows.add($MaintWindow)
  $ContentDB.Update()
Ok so that’s it – refresh your website and you should see the pink banner on the screenshot above!
Note, I originally tried to do this by just setting up a blank object without paramters, and then setting the properties one by one, but I found that MaintenanceStartDate and NotificationStartDate could not be changed after the object was created.
– Jack
Thank you for that last bit of information you shared. we have been beating our heads each time we had to change one notification when we had multiple maintenance windows set. So as long as we .add the .updated version and as long as we do not need to change the Maintenance start date or notification start date we can modify it.
Thanks Jonathan for taking the time to say this was helpful! Glad this was helpful and thanks for sharing your experiences with .add and .updated!